

This website may contain affiliate links and advertising so that we can provide recipes to you. Read my disclosure policy.
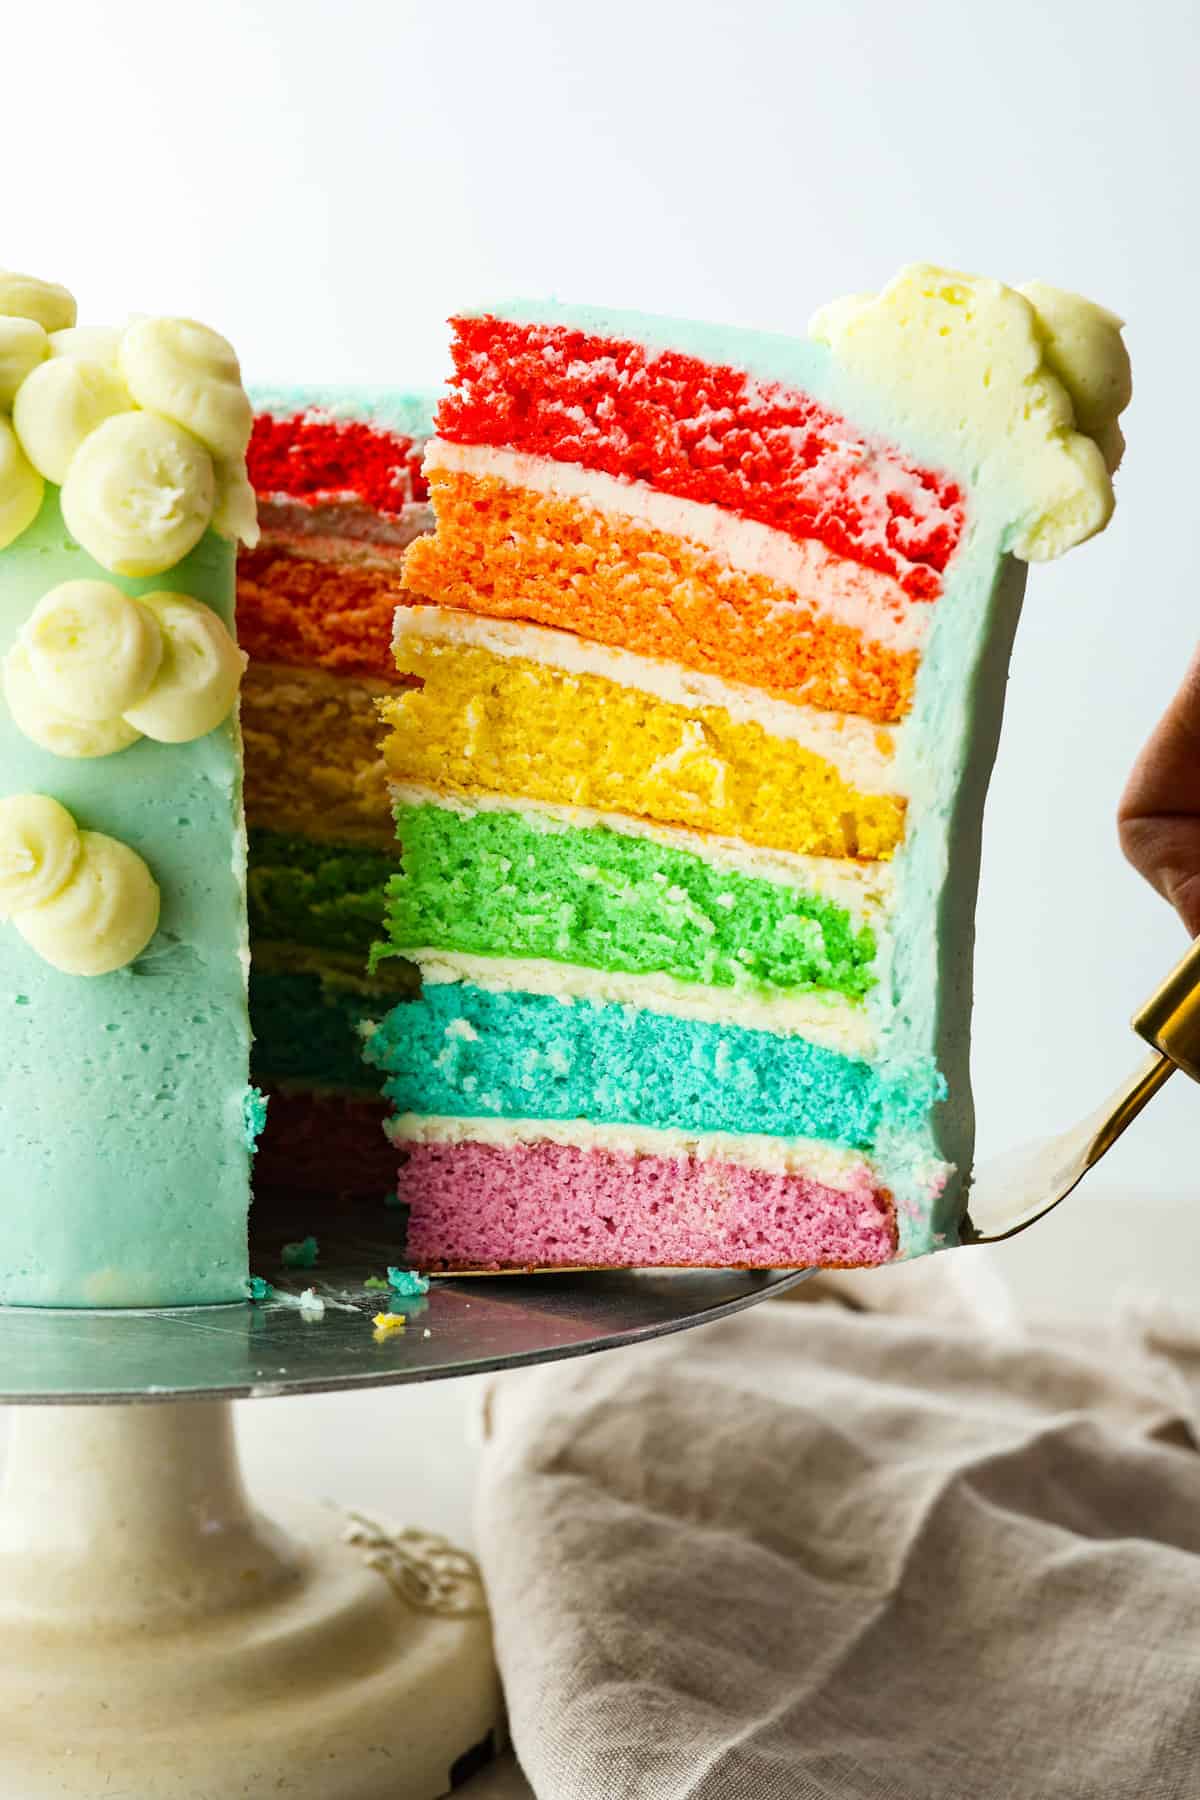
This gorgeous rainbow cake is the best way to add a splash of color to any special occasion! Not only is this cake beautiful to look at, but it’s extra moist and topped with luscious homemade buttercream. It’s the perfect dessert for birthdays, Saint Patrick’s Day, and more!
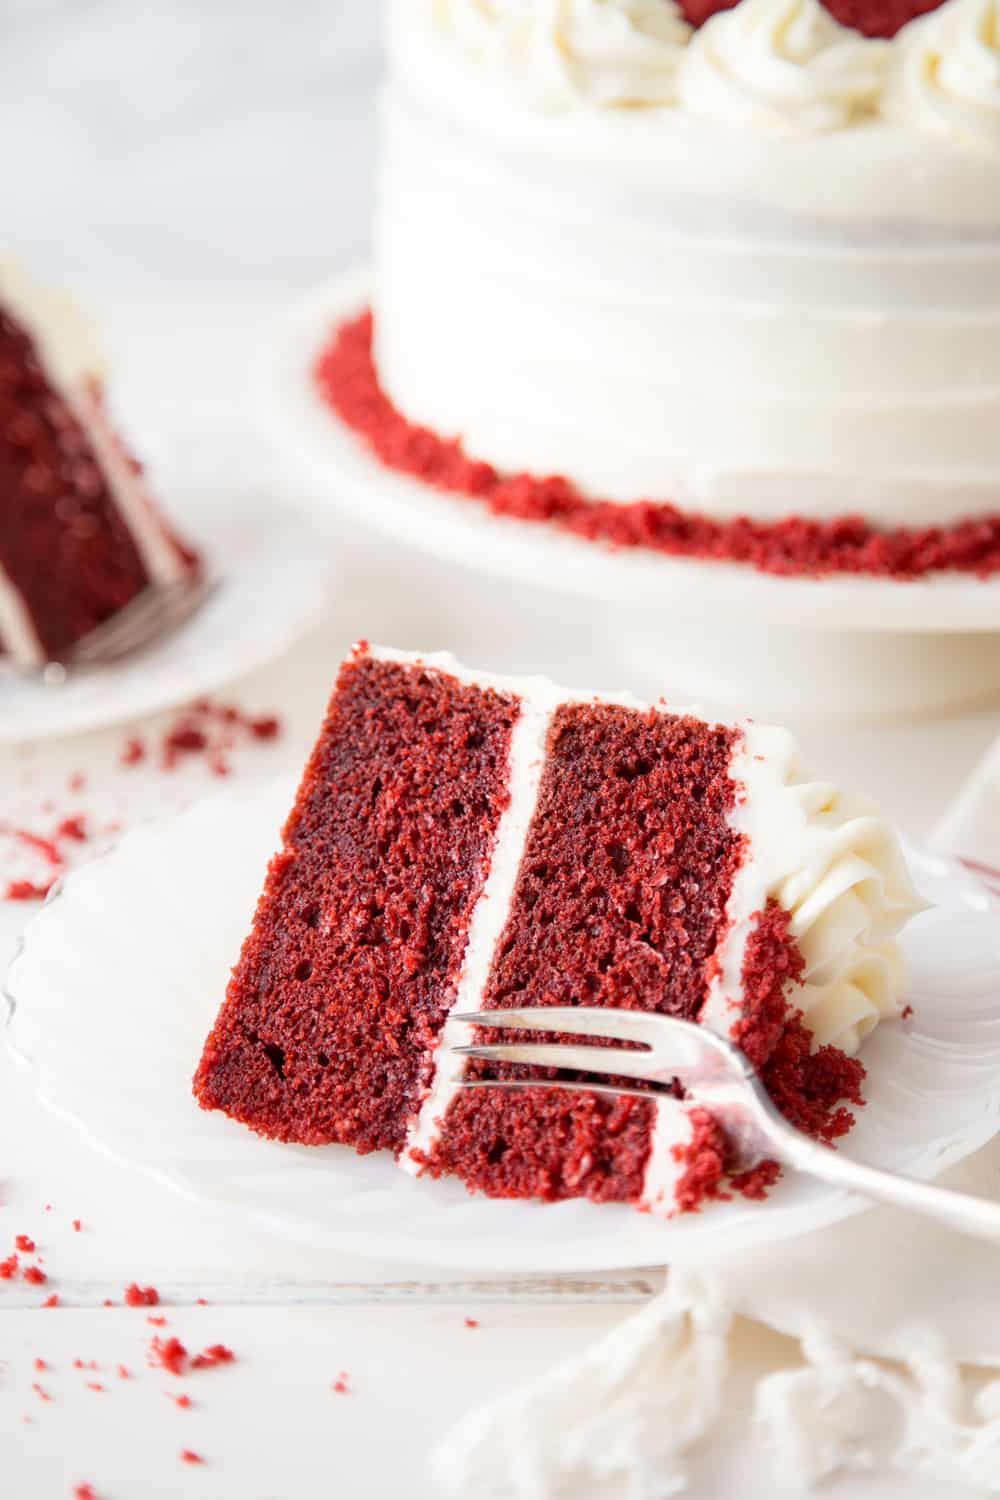
Festive cakes are my favorite. They look great, taste great, and are so fun to put together! If you’re looking for other show-stopping cakes, try this Easter cake, pink velvet cake, or homemade funfetti cake for more fun color!

Rainbow Layered Cake
If you’re looking for a show-stopping dessert, this rainbow cake is it. The colorful layers in each slice make it almost too pretty to eat, and it’s always a hit with kids who love rainbows. It’s easier to make than it looks, and if you want another fun, colorful treat, try my Circus Animal Cookies.
The cake itself is vanilla flavored, but feel free to add in different flavor extracts to switch things up! The cake is super soft and moist. You’re going to love it! Each rainbow layer is frosted with my tried and true buttercream recipe, which is absolutely to die for. So not only does this rainbow cake look great, but it tastes even better! This is the best dessert for birthdays or Saint Patrick’s Day parties. (You just need to add a pot of gold!) Let’s get started with everything you need to put it together!
Ingredients for Rainbow Cake
Between the cake and the frosting, this rainbow cake uses a bunch of simple ingredients. As long as you have food coloring, you may have everything you need to put it together! Check out the recipe card below for exact measurements.
For the Vanilla Cake:
- Cake Flour: I used cake flour here, but you can also use all-purpose flour. It will just give the cake a slightly different crumb.
- Granulated Sugar: Gives each layer of cake the perfect sweetness.
- Baking Powder and Baking Soda: Helps the cake turn out light and airy.
- Buttermilk: My secret weapon for cakes! It makes them extra tender and also adds a slight tangy flavor.
- Milk: I recommend using whole milk. The higher the fat content, the more moist your cakes will be.
- Vanilla Extract: Adds a sweet, floral flavor.
- Vegetable Oil: For moisture!
- Egg Whites: Help to leaven the cake and add structure. Make sure they’re at room temperature so they mix together smoothly with the batter.
- Food Coloring: I like using gel food coloring to color my cakes because it makes them so vibrant!
For the Buttercream Frosting:
- Unsalted Butter: Let it come to room temperature before you use it. This way, you’ll end up with smoother frosting.
- Powdered Sugar: For sweetness and a smooth texture.
- Vanilla Extract: Gives the frosting a delicious flavor.
- Salt: Just a pinch!
- Heavy Cream: Adjusts the consistency of the frosting.
- Food Coloring: You can use a drop of purple food coloring to counteract the yellow in the frosting. This will make it look nice and bright!
Using Different Frosting
Feel free to use cream cheese frosting for a little more tang, or white chocolate buttercream! You can even use regular chocolate buttercream if you want something richer.
How to Make a Layered Rainbow Cake
I know it may look like a lot of steps, but this easy rainbow cake is actually very straightforward to make! Whip this up for your next party and everyone will be impressed.
- Preheat Oven, Prep Pans: Preheat the oven to 350 degrees fahrenheit. Spray 6 8-inch cake pans with cooking spray and line with parchment rounds. If you don’t have 6 cake pans, use what you have and bake in batches. I baked two cakes at a time.
- Batter Mixture: In a large bowl whisk together the flour, sugar, baking powder, and baking soda. Add in the buttermilk, milk, vanilla and oil and mix until just combined.
- Whip Egg Whites: In another large bowl whip the egg whites until you reach medium stiff peaks.
- Combine: Fold the egg whites into the batter until no streaks of whites remain.
- Add Food Coloring: Separate the cake batter equally into 6 different bowls. I had about 275 grams of batter per bowl. Then color the batter red, orange, yellow, green, blue, and purple.
- Bake: Bake in prepared pans for 15-18 minutes, until the center of the cake springs back when lightly pressed on.
- Chill: Let the cakes cool completely before wrapping with plastic wrap and stored flat in the freezer overnight. This will make them easier to stack and frost.
Making the Buttercream Frosting/ Assembling the Rainbow Cake
- Mix Ingredients: Beat the butter and powdered sugar together in a stand mixer until combined. Then add the vanilla, salt and 4-5 tablespoons of cream. Beat until smooth. Add more cream if needed to reach a softer, smoother consistency.
- Separate: Reserve 2 cups of white frosting, and then tint the rest of it light blue.
- Layer: Start with the purple cake round on the bottom and add a thin layer of frosting. Then top with the blue round followed by a thin layer of frosting. Repeat with the rest of the rounds until you have them stacked purple, blue, green, yellow, orange, and finishing with red on top. Then add a thin layer of frosting over the outside of the cake to form the crumb coat. Chill for 20 minutes.
- Frost: Once the crumb coat has chilled, use a frosting spatula to smooth the frosting around the rainbow cake. Avoid lifting the spatula straight off the cake and instead swipe it along the cake until it comes off. This will help avoid pulling off the sides of the cake and getting crumbs in your buttercream.
- Add Decorations: Use a piping bag fitted with a very large round tip to pipe white clouds around the top and cascading over the top edge of the cake.

Tips and Tricks
Here are a few of my favorite tips on achieving the perfect layered cake. It’s sure to impress all of your guests (and make their stomachs happy!)
- Thickness of Layers: To achieve flatter cakes, let them cool in the pan for about 5 minutes before flipping upside down on a cooling rack. Let cool for 20 minutes before flipping back right side up. This will give you a nice flat top on your cake layers.
- Freezing Layers: Freezing the cake layers overnight helps prevent the cakes from crumbling as you frost them.
- Adjusting Colors: You can control how much coloring you want in the cake layers and frosting. It can be bright, neon, or pastel! Whatever shades you want for your rainbow, go for it.
- Remove Excess Frosting: When frosting the cake, scrape off excess frosting on the side of a bowl as you go so you have a clean edge to smooth better with.
- Use Homemade Cake: This cake is best made from scratch. Store-bought cake mixes lack the structure needed to support so many layers. If you use cake mix, you will risk ending up with a crumbling cake that won’t hold it’s shape as you stack and cut into it.

How Long Does Rainbow Cake Last?
Store leftover cake in an airtight container for up to 2 days at room temperature or up to 7 days refrigerated.

More Delicious Homemade Cakes
If you’re looking for more homemade cake recipes that are super soft, moist, and flavorful, here are a few of my favorites! You can’t go wrong with a good cake. It’s the perfect end to any dinner and there’s no wrong time to make one! Find my full list of cakes here.
Pin this now to find it later
Pin It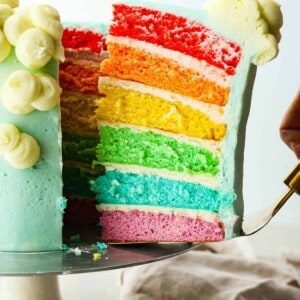
Rainbow Cake
Ingredients
Cake
- 3 ⅓ cup cake flour
- 2 ¼ cup granulated sugar
- 2 ¼ teaspoon baking powder
- ¾ teaspoon baking soda
- 1 ½ cup buttermilk
- ⅓ cup milk
- 3 teaspoons vanilla extract
- ¾ cup vegetable oil
- 6 egg whites room temperature
- Food coloring
Buttercream
- 2 pounds unsalted butter room temperature
- 16 cups powdered sugar
- 2 tablespoons vanilla extract
- 1 pinch salt
- 1/3 cup heavy cream more if needed
- Food coloring
Instructions
- Preheat the oven to 350 degrees fahrenheit. Spray 6 8-inch cake pans with cooking spray and line with parchment rounds. If you don’t have 6 cake pans, use what you have and bake in batches. I baked two cakes at a time.
- In a large bowl whisk together the flour, sugar, baking powder, and baking soda. Add in the buttermilk, milk, vanilla and oil and mix until just combined.
- In another large bowl whip the egg whites until you reach medium stiff peaks.
- Fold the egg whites into the batter until no streaks of whites remain. Separate the batter equally into 6 different bowls. I had about 275 grams of batter per bowl. Color the batter red, orange, yellow, green, blue, and purple.
- Bake in prepared pans for 15-18 minutes, until the center of the cake springs back when lightly pressed on.
- Let the cakes cool completely before wrapping with plastic wrap and stored flat in the freezer overnight. This will make them easier to stack and frost.
Buttercream
- Beat the butter and powdered sugar together in a stand mixer until combined. Add the vanilla, salt and 4-5 tablespoons of cream. Beat until smooth. Add more cream if needed to reach a softer, smoother consistency.
- Reserve 2 cups of white frosting, and tint the rest of it light blue.
- Start with the purple cake round on the bottom and add a thin layer of frosting. Top with the blue round followed by a thin layer of frosting. Repeat with the rest of the rounds until you have them stacked purple, blue, green, yellow, orange, and finishing with red on top. Add a thin layer of frosting over the outside of the cake to form the crumb coat. Chill for 20 minutes.
- Once the crumb coat has chilled, use a frosting spatula to smooth the frosting around the cake. Avoid lifting the spatula straight off the cake and instead swipe it along the cake until it comes off. This will help avoid pulling off the sides of the cake and getting crumbs in your buttercream.
- Use a piping bag fitted with a very large round tip to pipe white clouds around the top and cascading over the top edge of the cake.
Nutrition
Nutrition information is automatically calculated, so should only be used as an approximation.


I really wish I could post a photo of the end result. I followed the cake recipe exactly but didn’t freeze overnight. I refrigerated it for 15 minutes with no issues. There was way too much icing. I threw away so much! Also, with the icing I eyed the sugar measurent and didn’t end up using any liquid besides the vanilla. The flavor is out of this world delicious and the decorating was super easy. I’m a novice baker and this recipe made me look pro. Thank you. ?