

This website may contain affiliate links and advertising so that we can provide recipes to you. Read my disclosure policy.
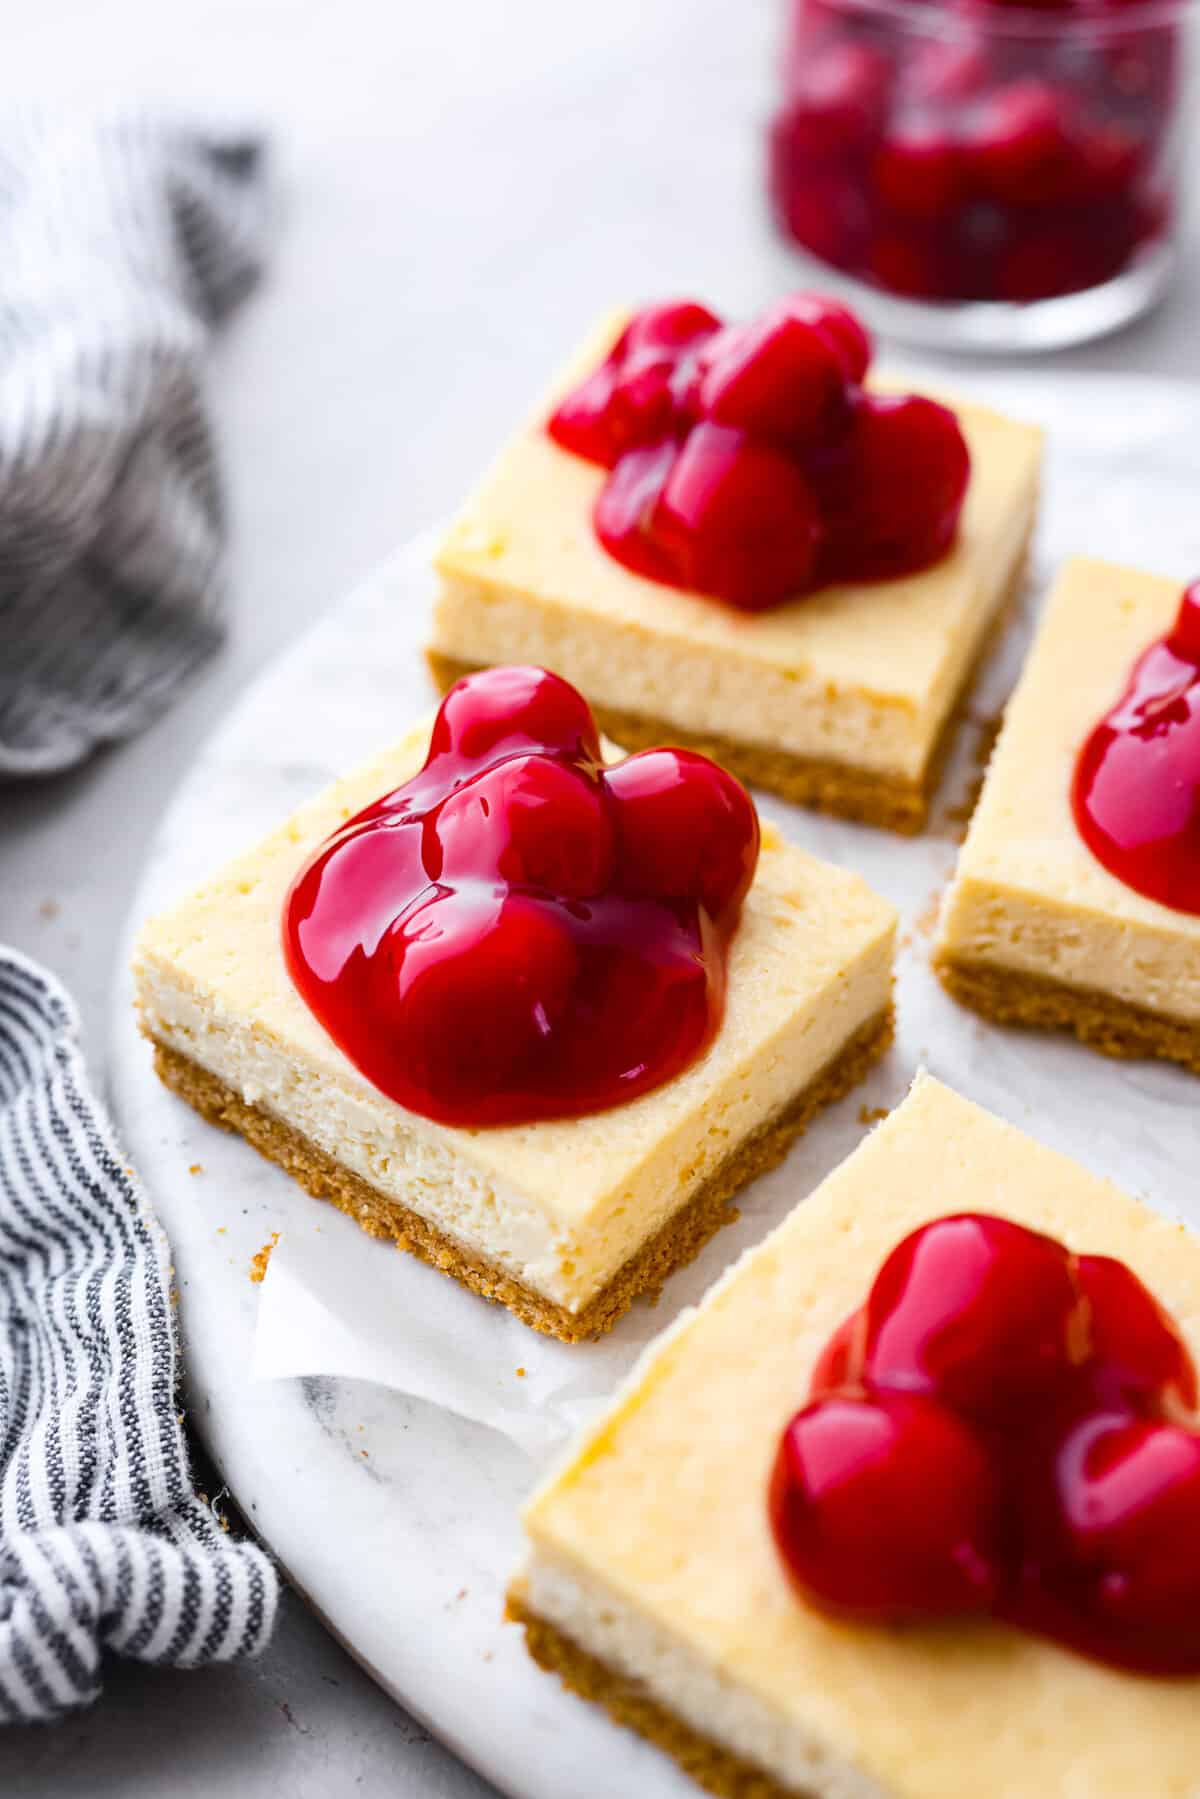
These Cherry Cheesecake Bars are the perfect make-ahead dessert for any occasion! Creamy cheesecake sits atop a homemade graham cracker crust, and is finished off with a generous helping of cherries.
Love cheesecake but not the hassle of making it from scratch? Try these recipes instead! Mini cheesecakes, lemon cheesecake bars, or sopapilla cheesecake bars!

Easy Cherry Cheesecake Bars
I love homemade cheesecake. But sometimes I don’t want to go through the effort of making a regular-sized cheesecake and worrying about water baths, cracking, and all those considerations that come along with traditional cheesecake. These cherry cheesecake bars are super simple to make and are always a crowd pleaser!
The first step in this recipe is to make the crust. You’ll need graham cracker crumbs, butter and sugar which get pressed into the bottom of a square pan, then baked until crisp. While the crust is baking, I prepare the filling. Here are the ingredients you’ll need for both:
Ingredient List
The filling is a simple combination of cream cheese, vanilla extract, eggs, sugar and heavy cream. If you don’t have heavy cream on hand, sour cream will also work. The cheesecake bars will need to chill for at least 2 hours, so plan accordingly! You can actually prepare the bars up to 3 days before you plan to serve them, then simply slice and top with cherries right before serving.
Crust:
- Graham Cracker Crumbs: Form the base of the crust.
- Sugar: Sweetens and helps bind the crumbs together once baked.
- Salted Butter: Adds moisture, richness, and also keeps the crust in place. Unsalted butter will also work if that’s all you have on hand. You can add a pinch of salt to the crust mixture separately.
Cheesecake Filling/ Topping:
- Cream Cheese: The star ingredient! This creates the classic rich and creamy cheesecake texture.
- Sugar: Sweetens up the filling.
- Sour Cream: Adds a touch of tang and keeps the filling moist.
- Heavy Cream: Enhances richness and also prevents cracks in the baked cheesecake.
- Eggs: Bind the ingredients and provide structure for a perfect slice!
- Vanilla Extract: Infuses the filling with a hint of sweet, aromatic flavor.
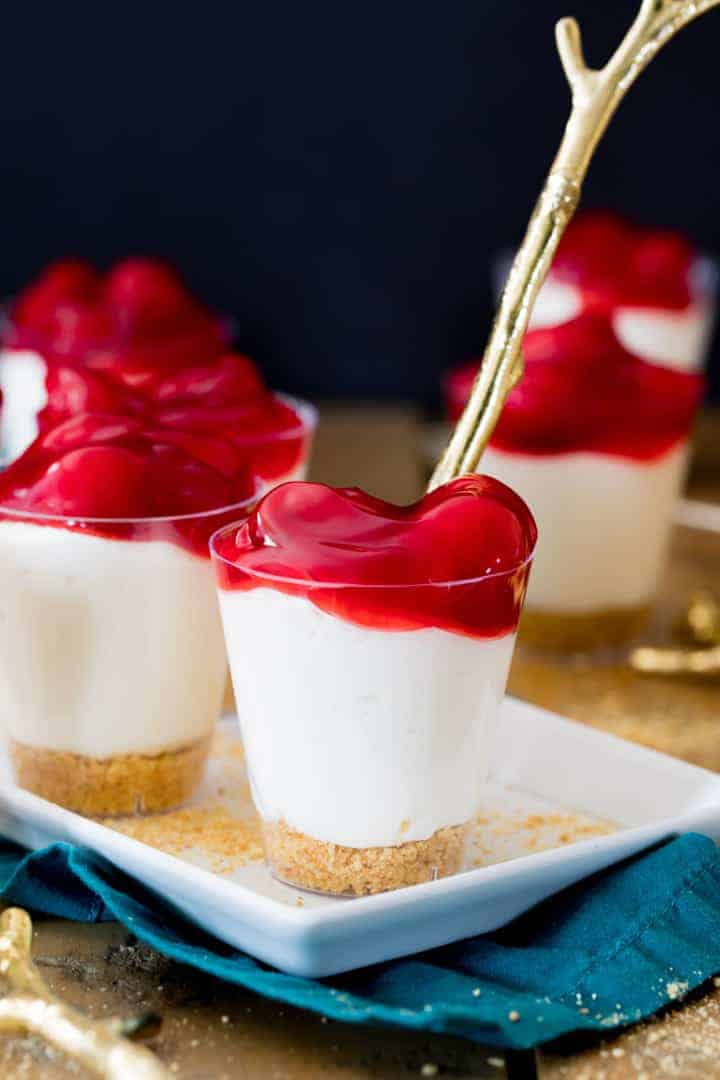
- Cherry Pie Filling: For the topping!
Other Topping Flavors
What I love about this recipe is that you really can change it up by using a different flavor of pie filling, like apple or blueberry, or even just using sliced fresh fruit instead of pie filling.
How to Make Cherry Cheesecake Bars
I actually think the trickiest part about this cheesecake bar recipe is cutting the bars into neat squares! The bars are easiest to cut straight from the fridge and when you use a hot knife. (See the tips below!) This recipe makes about 9 larger squares or 12 smaller squares.
- Preheat Oven, Prepare Pan: Preheat the oven to 325 degrees Fahrenheit. Line a 9×9-inch pan with parchment paper, leaving a 1 or 2-inch overhang on either side of the pan, and spray with pan spray.
- Graham Cracker Mixture: In a medium bowl, mix together the graham cracker crumbs, sugar, and butter together until it resembles wet sand.
- Add to Pan: Firmly press the mixture into the bottom of the prepared pan and bake for 10 minutes. Remove from the oven and let the crust cool while you prepare the filling for the cherry cheesecake bars.
Cheesecake
- Beat Cream Cheese: Add the cream cheese to a large bowl and beat with a hand mixer or the paddle attachment of a stand mixer and beat until it is smooth and creamy. Scrape down the sides and bottom of the bowl as needed.
- Mix In Remaining Ingredients: Add the sugar, sour cream, heavy cream, and vanilla and beat until combined. Add the eggs one at a time, beating well after each addition. Pour the batter over the cooled crust.
- Bake: Return the pan to the oven and bake for 28-30 minutes, or until the center is set.
- Chill: Remove the pan from the oven and allow it to cool to room temperature before chilling in the refrigerator for at least 2 hours.
- Cut: Once chilled, carefully remove the cheesecake bars from the pan using the parchment paper. Cut into 9 or 12 squares, depending on your preference.
- Add Topping: Spoon approximately 2 tablespoons of cherry pie filling over each cheesecake bar and serve.

Tips for Making Cherry Cheesecake Bars
Cherry cheesecake bars are super simple to make, but here are a few more tips for success!
- Use Full-Fat Ingredients: Use full-fat cream cheese and sour cream! Decadent cheesecake bars isn’t the time to skimp on the fat.
- Room Temperature Ingredients: Room-temperature ingredients will blend more smoothly, so set your cream cheese, sour cream, cream, and eggs on the counter for an hour or two before you’re ready to start baking.
- Making Graham Cracker Crumbs: If you don’t have graham cracker crumbs, blend 12 whole graham crackers in the food processor or blender until finely ground.
- Don’t Over-bake the Bars! The center of the cheesecake bars should have just the slightest wobble to it, like jello after it has been set.
- Cutting Into Squares: Use a hot knife to cut your cherry cheesecake bars for the cleanest cut. Run a chef’s knife under very hot water, dry with a clean kitchen towel, and then slice. Repeat these steps between each cut for the cleanest slices.

Storing Leftovers / Freezing
Store leftover cherry cheesecake bars in the refrigerator for up to 7 days. Keep them in an airtight container, or cover the baking pan tightly with plastic wrap.
These cherry cheesecake bars can also be made in advance and frozen! Remove the chilled bars from the pan and slice them into pieces. Place them on a parchment-lined baking sheet and freeze for 2 hours, until the bars are frozen solid. Transfer them to an airtight container, laying a piece of parchment between them if you are going to stack them. They will keep for up to 3 months. Thaw in one layer in the fridge overnight.

More Easy Recipes for Cheesecake Lovers
Pin this now to find it later
Pin It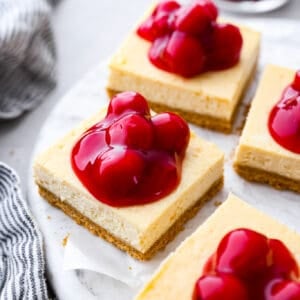
Easy Cherry Cheesecake Bars
Ingredients
Crust
- 1 ½ cups graham cracker crumbs
- ¼ cup granulated sugar
- ¼ cup salted butter, melted
Cheesecake
- 16 ounces cream cheese, softened
- ½ cup sugar
- ¼ cup sour cream
- 2 tablespoons heavy cream
- 3 large eggs, room temperature
- 2 teaspoons vanilla extract
- 1 can cherry pie filling
Instructions
- Preheat the oven to 325 degrees Fahrenheit. Line a 9×9-inch pan with parchment paper, leaving a 1 or 2-inch overhang on either side of the pan, and spray with pan spray.
- In a medium bowl, mix together 1 ½ cups graham cracker crumbs, ¼ cup granulated sugar, and ¼ cup salted butter, together until it resembles wet sand.
- Firmly press the mixture into the bottom of the prepared pan and bake for 10 minutes. Remove from the oven and let the crust cool while you prepare the filling.
Cheesecake
- Add 16 ounces cream cheese, to a large bowl and beat with a hand mixer or the paddle attachment of a stand mixer and beat until it is smooth and creamy. Scrape down the sides and bottom of the bowl as needed.
- Add ½ cup sugar, ¼ cup sour cream, 2 tablespoons heavy cream, and 2 teaspoons vanilla extract and beat until combined. Add the 3 large eggs, one at a time, beating well after each addition. Pour the batter over the cooled crust.
- Return the pan to the oven and bake for 28-30 minutes or until the center is set.
- Remove the pan from the oven and allow it to cool to room temperature before chilling in the refrigerator for at least 2 hours.
- Once chilled, carefully remove the bars from the pan using the parchment paper. Cut the cheesecake into 9 or 12 squares, depending on your preference.
- Spoon approximately 2 tablespoons of 1 can cherry pie filling over each bar and serve.
Notes
Nutrition
Nutrition information is automatically calculated, so should only be used as an approximation.


Yummy and very easy cheesecake recipe. I’ll definitely make this again!
Took off a couple stats because I don’t think the crust ingredients are right. I made a directed and had over 1/3 chip melted butter standing on top. Drained as much as I could off before baking. Baked it 20 min instead of 10 and it never got crispy like it indicates. The filling is great, but I would use a different graham crust recipe next time. Crust came out edible in the end, but I’ve definitely had better & easier to make graham crusts. I suspect the measurements are just off in this recipe.
These were a great finisher for a cookout- so much easier than regular cheesecake and everyone loved them! The only thing I changed was stirring a teaspoon of lemon juice into the pie filling for a bit of tart against all of the sweet. Would work with a variety of toppings. For some reason a deep crack showed up down the center, but it didn’t matter because I was going to cut them, anyhow. Keeping this one for future use!
Hi there,
I love the idea of mini cheesecakes If I made them a couple days ahead would I cover loosely with saran when stored in fridge? I’d hate for them to accumulate moisture. What do you think?
hey girl- these look so yummy!
Going to try these super soon!!!!
Just wish we did not have to use foil
on the bottom. Does it really stick that badly?
Thanks for the cool recipe!!!
Use parchment paper instead.
I’m an absolute nut for cheesecake! These look incredible, and I love the cherry topping.
wonderful calorie splurge opportunity, thank you! It’s okay on occasions like the one these are designed for, thank you!