

This website may contain affiliate links and advertising so that we can provide recipes to you. Read my disclosure policy.
This gorgeous crystal candy tastes as good as it looks! Inspired by the Japanese candy “Kohakutou,” it’s such a fun treat to make with the kids. It has an addictive crunch to it and can be made with any flavor of your choosing!
I love fun activities with the kids that double as a tasty treat! Nothing quite lives up to this crystal candy (isn’t it beautiful?!) but a few more fun recipes to try are: ice cream in a bag, snow ice cream, and hot chocolate bombs!

Kohakutou Crystal Candy Recipe
You may have seen this gem-like treat on social media—it’s called Kohakutou and comes from Japan! Translated, it means “amber candy.” All you need are a few simple ingredients: sugar, agar agar, food coloring, and your favorite flavoring. Best of all, it’s vegan and gluten-free, making it the perfect sweet treat for everyone in the family. If you enjoy unique Japanese treats, you’ll also love my Japanese soufflé pancakes.
Kohakutou is made by coating cubes of agar jelly with sugar, creating a chewy center with a crisp exterior. Usually fruit-flavored, it’s as pretty as it is tasty. Often packaged in small boxes or bags, this candy makes a fun gift that’s sure to impress your neighbors or friends!
Ingredients Needed
The BEST part about this crystal candy recipe is all of the simple ingredients it uses! It’s so easy to whip up with the kids. Just make sure you have agar agar, that’s what’s going to give the candy a slightly gummy texture.
- Water: Water is a crucial ingredient in making crystal candy as it is used to dissolve the sugar and agar agar powder.
- Agar Agar Powder: Agar agar is a type of seaweed-based gelatin. It’s used to give crystal candy its firm and slightly chewy texture. It’s dissolved in boiling water along with the sugar to create the candy base!
- Granulated Sugar: Adds sweetness to the crystal candy and also helps to create a crystal-like structure when it cools!
- Flavoring: A small amount of flavoring, such as vanilla, fruit extracts, or other flavorings, is added to the candy mixture to give it yummy flavor. Use your favorites here! I used a variety pack of fruit oils from Amazon.
- Liquid Food Coloring: Adds color to the crystal candy. You can adjust how much you add in to make it vibrant or more subtle like a real gemstone.
How to Make Crystal Candy (Kohakutou)
Crystal candy is so fun to make! It’s super simple, honestly the hardest part is waiting a few days while it sets! So, grab your family and make a batch of this delightful candy! My kids love to customize the colors and flavors of their candy. The process is so fun!
- Prepare Ingredients: Before you begin, make sure you have everything out and ready because the candy begins to set up quickly after cooking. However many different flavors and colors you would like to use, lightly grease small containers. I used small tupperware and do 2-3 flavors per batch. Have your food coloring and flavoring ready to go.
- Agar Agar Mixture: Add the water to a small pot and then sprinkle the agar agar in. Stir and let stand for 5 minutes.
- Boil, Add Sugar: Bring the water and agar agar to a boil and then boil for 3 minutes. Add the sugar and stir. Reduce the heat and simmer for 2-3 minutes.
- Separate: Remove from the heat and separate into the different prepared containers. Move quickly but carefully and add your flavoring and coloring to the candy. In total you should use about ¼ teaspoon of flavoring, so if you choose to do more than one flavor stick with just a few drops of flavoring to avoid it being too strong.
- Swirl: Use a toothpick or wooden skewer to swirl the flavoring and color through the candy.
Creating the Crystal Shapes
- Chill: Cover and refrigerate for 1-2 hours, until the candy is firm. Then use a knife to pop the candy out in one piece onto a cutting board. It should be firm but sticky.
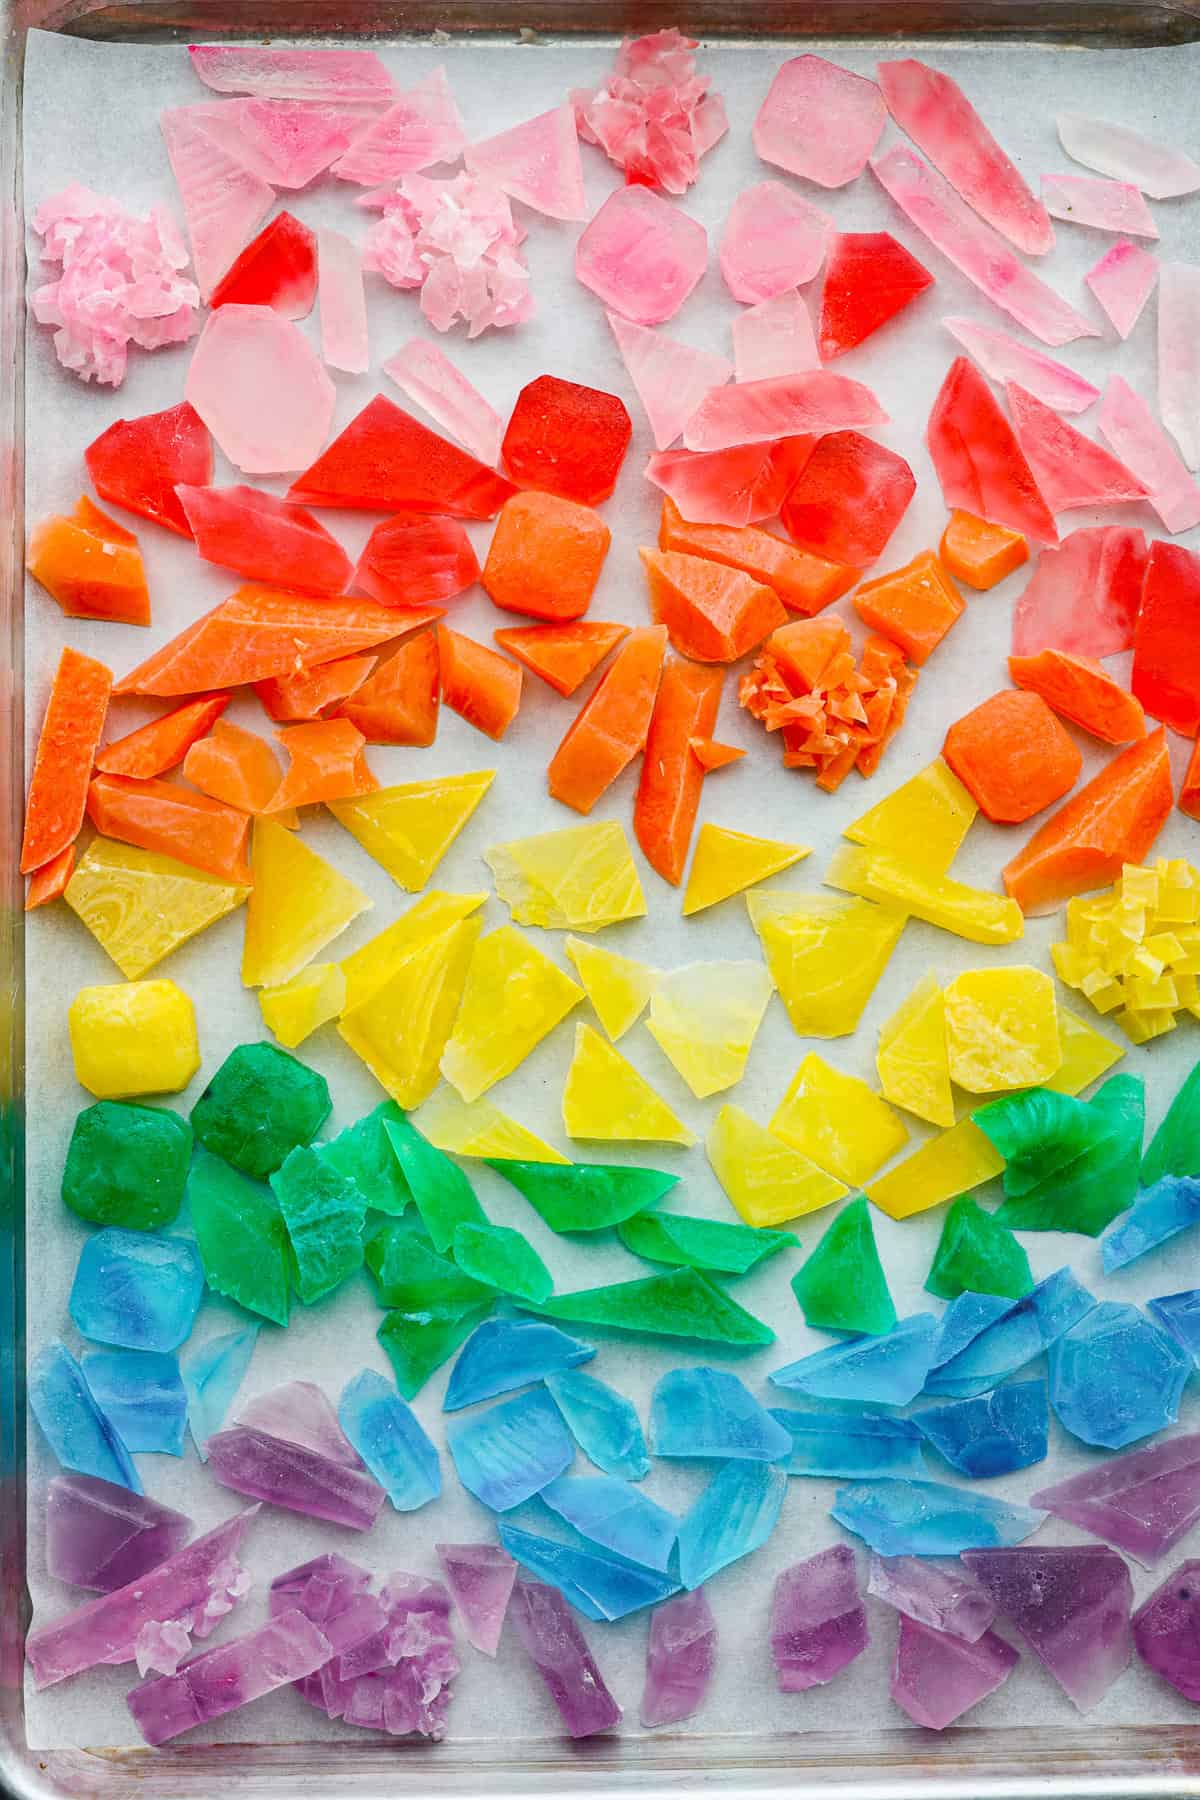
- Cut: Use a paring knife to cut the crystal candy to whatever shapes you want. You can trim, or “bevel” the edges so the pieces look more crystal or gem like.
- Add to Baking Sheet: Lay all the candy pieces out on parchment lined baking sheets.
- Set: Then store in a cool, dry place for 5-7 days at minimum, rotating them as needed so all the pieces form a crust on the outside.

Tips and Tricks
Here are a few more tips to keep in mind so your crystal candy turns out perfectly! Making this beautiful candy is so fun, and you end up with a delicious treat at the end!
- Using Agar Agar: Agar agar is an essential ingredient for these candies and unfortunately doesn’t have a good substitute. You can find it pretty easily on Amazon.
- Use Liquid Food Coloring: Liquid food coloring is the best for this recipe. Airbrush food colors are really good options for getting a variety of colors. Less is more!
- Use Different Molds: Experiments with different molds. Spray silicone molds with pan spray and use a paper towel to soak up excess grease. Carefully pour the hot candy into the molds after adding the flavoring and color.
- Thickness: When picking a container keep in mind that the thicker the candy is, the longer it will take to crust over.
How Long Does Crystal Candy Last?
My kids always want to eat this candy in one sitting. If you’re lucky enough to have some left over, here’s how to keep it tasting nice and fresh!
- At Room Temperature: Store in an airtight container in a cool place for up to 4 weeks.
- Adjust Texture: If you would like harder, crunchier candy, let the candy sit out for longer than 7 days before transferring to an airtight container.

More Kid-Friendly Recipes
Here are a few more recipes that are as fun to make as they are to eat! I love making them with my kids. It’s a great way to get them off of their iPads! I’ve also included a recipe for dog treats so your furry friends can join in on the fun!


Pin this now to find it later
Pin It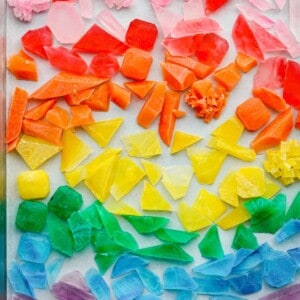
Crystal Candy
Ingredients
- 1 ⅔ cup water
- 3 teaspoons agar agar powder
- 3 cups granulated sugar
- ¼ teaspoon flavoring of choice
- 1-3 drops liquid food coloring as desired
Instructions
- Before you begin make sure you have everything out and ready because the candy begins to set up quickly after cooking. However many different flavors and colors you would like to use, lightly grease small containers. I used small tupperware and do 2-3 flavors per batch. Have your food coloring and flavoring ready to go.
- Add the water to a small pot and sprinkle the agar agar in. Stir and let stand for 5 minutes.
- Bring the water and agar agar to a boil and boil for 3 minutes. Add the sugar and stir. Reduce the heat and simmer for 2-3 minutes.
- Remove from the heat and separate into the different prepared containers. Move quickly but carefully and add your flavoring and coloring to the candy. In total you should use about ¼ teaspoon of flavoring, so if you choose to do more than one flavor stick with just a few drops of flavoring to avoid it being too strong.
- Use a toothpick or wooden skewer to swirl the flavoring and color through the candy.
- Cover and refrigerate for 1-2 hours, until the candy is firm. Use a knife to pop the candy out in one piece onto a cutting board. It should be firm but sticky.
- Use a paring knife to cut the candy it to whatever shapes you want. You can trim, or “bevel” the edges to make the pieces look more crystal or gem like. If you have scraps from trimming the edges, chop them into small pieces and add them to a larger one or form them into their own crystal cluster.
- Lay all the candy pieces out on parchment lined baking sheets.
- Store in a cool, dry place for 5-7 days at minimum, rotating them as needed so all the pieces form a crust on the outside. You can cover them with a lid, but they will take longer to form the crust.
- Once the candy has fully crusted, you may add edible gold luster dust or gold leaf if desired.
Nutrition
Nutrition information is automatically calculated, so should only be used as an approximation.


So I just made this recipe and it set perfect. I’ve cut and got them on a sheet pan. Only downside is that I’ve got to wait so many days before they’re done!!! ?
Candy never set properly. If any adjustments or specific brands are needed to make this recipe work, I really wish it was stated.
this is fun, so many options and a nice way to be creative, thank you!