

This website may contain affiliate links and advertising so that we can provide recipes to you. Read my disclosure policy.
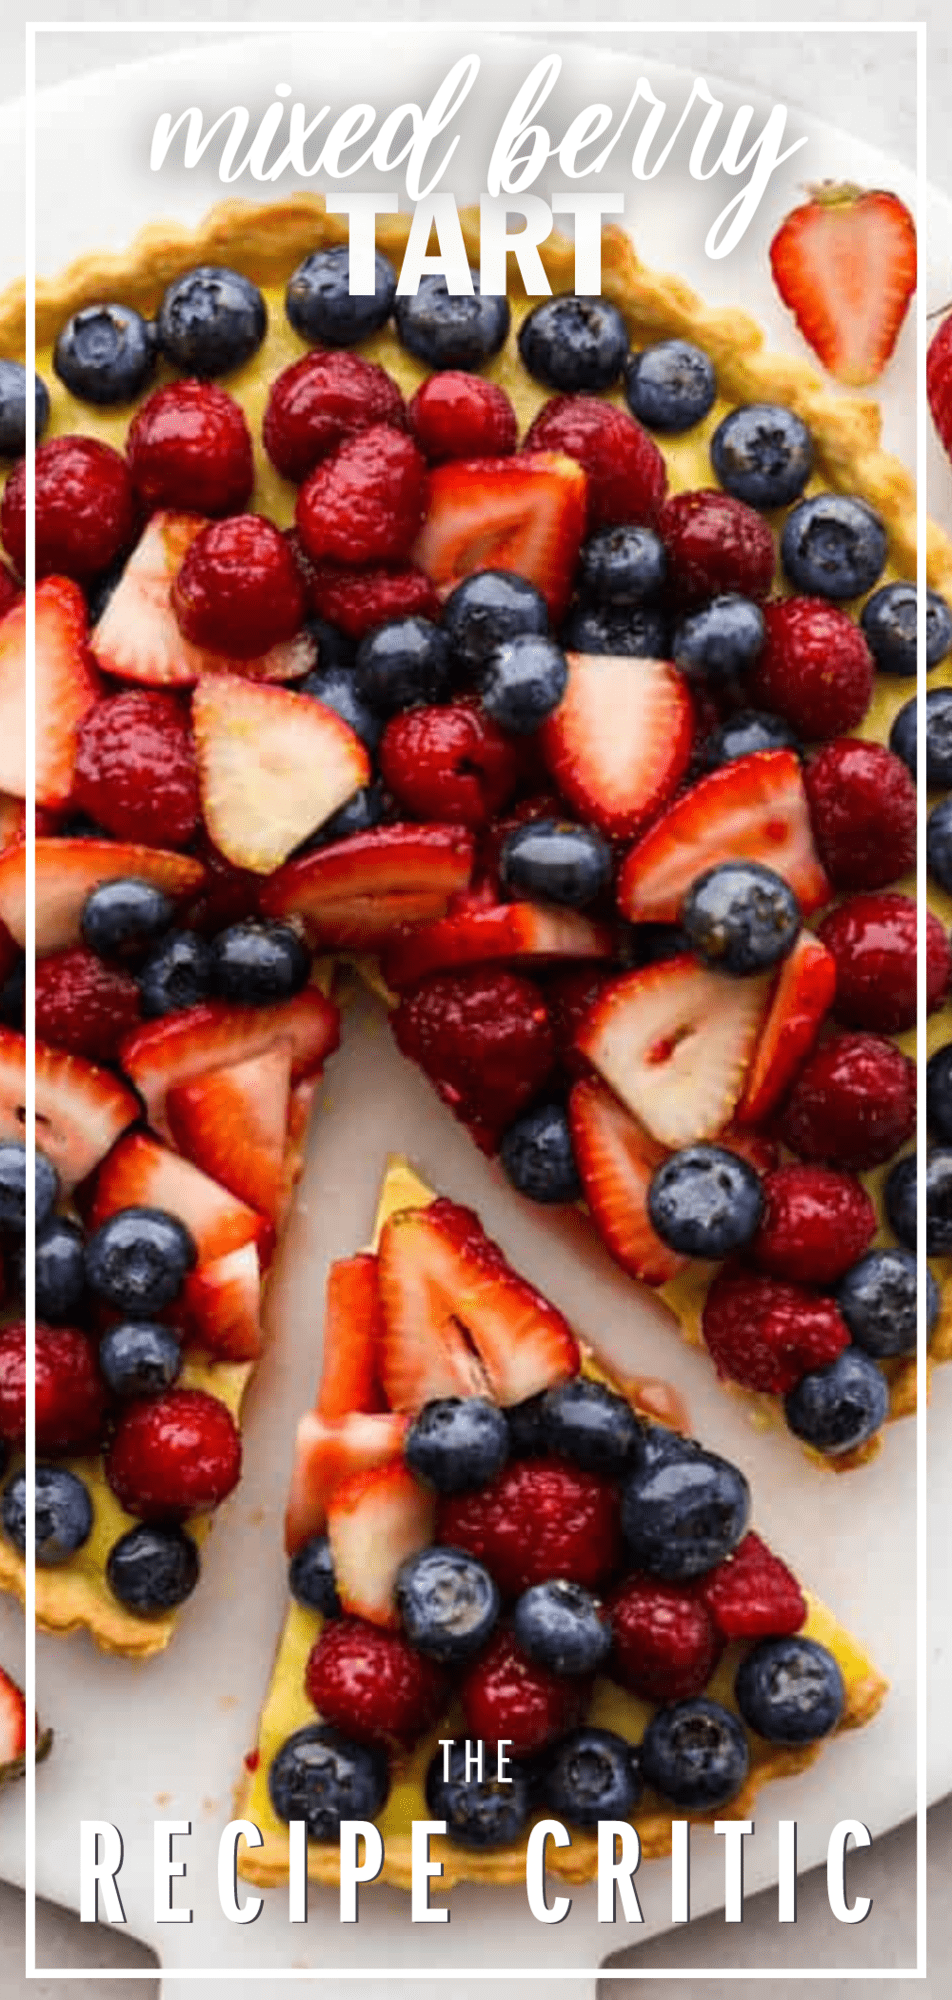
A buttery, flaky homemade crust, vanilla bean custard filling, and juicy berries make this berry tart the ultimate summer dessert! It’s a beautiful and delicious way to showcase all the best fruit this season has to offer!
Tarts are all the best things about dessert combined. They’re creamy and fruity inside a delicious buttery crust! You’ll have to try lemon, strawberry, and cranberry tarts next!

Mixed Berry Tart Recipe
As the weather has been heating up, I’ve been gravitating towards bright and fruity desserts. I’ve posted a few fruit tart recipes on the blog so far (this apple tart is one of my all-time favorite desserts!) but there’s something about this mixed berry tart that I just can’t get enough of! The golden, flaky crust, melt-in-your-mouth vanilla cream filling, and plump, fresh berries create a dessert your tastebuds will go crazy over. It’s the perfect, colorful centerpiece for any summer get-together!
I used a classic blend of strawberries, raspberries, and blueberries for this recipe. The great thing is, you can make this tart with whatever fruit is in season and it will taste just as delicious! Feel free to mix and match the toppings! Don’t worry about the fruit being too tart- it gets sealed in with an apricot jam glaze for the perfect bit of added sweetness and luster. Without further ado, let’s jump into how you can recreate this beautiful, fruity dessert at home!
Berry Tart Shell and Filling Ingredients
Don’t let the long list of ingredients fool you. This berry tart uses plenty of basic ingredients! You’ll probably be able to find most of them in your kitchen right now! Since we’re showcasing fruit here, be sure your berries are fresh and ripe! That’s the key to making the most delicious fruit tart possible.
Crust:
- Flour: For a light and flaky crust, all-purpose flour works great!
- Granulated Sugar: Added to make your homemade crust nice and sweet.
- Salt: A pinch of salt will keep your crust from tasting bland.
- Unsalted Butter: Make sure the butter you use is cold! Lower temperatures = a flakier crust. See more on this in the tips section below!
- Egg Yolk: Used to bind ingredients together and help your crust take shape.
- Cold Water: Add as needed to adjust the consistency of your dough.
Filling:
- Whole Milk: Creates a smooth consistency and adds fat content for a rich and creamy custard.
- Vanilla Bean Pod: Using fresh vanilla is a must for the best flavor!
- Granulated Sugar: Added to sweeten up the custard filling.
- Salt: A pinch will enhance the overall flavor of your tart filling.
- Cornstarch: Cornstarch gives your custard a nice, thick consistency and helps prevent curdling.
- Egg Yolks: Act as a thickener and make the texture of the tart filling nice and smooth.
- Unsalted Butter: Adds a creamy, rich flavor to the custard.
- Berries: I used a mix of fresh strawberries, raspberries, and blueberries.
- Apricot Jam: Acts as a sweet and shiny glaze on top!
How to Make a Berry Tart
Making the perfect fruit tart takes a bit of patience but it’s so worth it! Honestly, the hardest part is waiting for your berry tart to chill. It looks so irresistible, it’s hard to keep myself from snagging a slice.
Start With the Perfect Crust
- Mix Dry Ingredients: In a medium bowl, mix the flour, sugar, and salt together. Using a fork or a pastry blender, cut the cold butter into the flour mixture and continue to cut it in until it begins to resemble breadcrumbs.
- Add Egg Yolks, Shape Dough: Next, add in the egg yolk and mix as best you can with a fork before adding 2 tablespoons of the chilled water. Knead the dough together gently, adding more water if necessary to bring the dough together in a ball.
- Chill Dough, Preheat Oven: Wrap the dough in plastic wrap and allow to chill in the fridge for 30 minutes and preheat the oven to 375° while it chills.
- Roll and Shape: Once chilled, roll the dough out into a 1/8 inch thick circle. If the dough is cracking as you roll, give it a few minutes to warm up slightly before trying again. To transfer it to the tart pan, roll the pastry up on your rolling pin and unroll it over the tart pan.
- Add to Pan: Press the bottom and sides into the pan. Trim the excess dough by rolling the rolling pin over the top of the tart pan. Prick the bottom of the pan a few times with a fork and lay a good-sized piece of parchment in the center of the crust. Add pie weights, uncooked beans, or uncooked rice to the center to weigh down the parchment.
- Bake Crust: Bake for 15 minutes, remove the parchment and weights from the crust and then bake for an additional 10 minutes, or until the edges are golden brown. Let cool completely.
Making the Vanilla Custard Filling
- Remove Vanilla Beans: Use the blunt side of a paring knife to remove the seeds from the vanilla pod.
- Mix Milk and Vanilla: Add the milk and vanilla beans to a medium saucepan. Heat over medium heat until the edges of the milk begin to bubble, but not boil.
- Prepare Sugar and Egg Yolk Mixture: While the milk heats, whisk together the sugar, salt, cornstarch, and egg yolks in a medium sized bowl. As soon as the milk starts simmering, remove it from the heat and slowly pour it into the egg yolk mixture while whisking constantly.
- Whisk and Thicken: Add the mixture back into the saucepan and return to medium heat. Whisk constantly for 1-2 minutes until it starts to thicken. Lower the heat to low and continue to whisk for 3-4 minutes as the mixture continues to thicken and starts to bubble.
- Add in Butter: Remove from the heat and whisk in the butter until it is completely absorbed. Pour the custard into the cooled crust. Immediately cover the hot custard with plastic wrap, being sure the plastic wrap touches the entire surface to prevent a skin from forming.
- Chill: Place in the fridge and cool for 4 hours, or overnight.
- Add Berries and Apricot Glaze: Top with fresh berries as desired being sure to cover the whole top of the custard. In a small bowl mix 2 tablespoons of apricot jam mix with 1 teaspoon of water and heat in the microwave for 10 seconds. Mix again before using a pastry brush to brush the glaze across the top of the berries.

Tips and Tricks
From picking out vanilla pods to perfecting your crust, here are a few of my favorite tips to keep in mind while you make your berry tart! You’re going to love how it turns out!
- Use Cold Butter: Using cold butter is crucial to the perfect flaky crust. Because cold butter won’t be completely integrated into the dough, it leaves pockets of air throughout. When exposed to the heat of the oven, the cold butter expands and creates that fluffy, flaky texture we all love!
- Allow Crust to Rest: Be sure to let your dough rest in the fridge for at least 30 minutes before use. This way, the gluten will relax and it will be able to be shaped more easily.
- Picking Vanilla Beans: If possible, pick vanilla bean pods that are plump and glossy on the outside. If your pods look shriveled or brittle, it may be difficult to remove the beans.
- More Fruits to Try: Feel free to swap out any of the berries with things like sliced grapes, kiwis, pears, peaches, blackberries, and oranges. If you have all of the colors, you can even arrange your fruit in a rainbow pattern like this fruit pizza!

How Long Are Berry Tarts Good For?
Since we’re working with fresh fruit, your berry tart is best served as soon as possible. You want all of those delicious summer berries to shine!
- In the Refrigerator: Covered with plastic wrap or in an airtight container, your berry tart will stay fresh for up to 2 days.

More Fruit Desserts for Summer
Nothing complements warm weather and sunny days quite as well as a juicy dessert! Here are a few tasty fruit desserts to whip up when you get a sweet tooth! They are all quick, easy, and bursting with succulent fruit flavor.
Pin this now to find it later
Pin It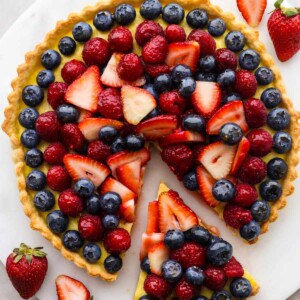
Berry Tart
Ingredients
Crust
- 1 ½ Cup Flour
- ¼ Cup Granulated Sugar
- ¼ Teaspoon Salt
- ¼ Cup Unsalted Butter Cold
- 1 Egg Yolk
- 2-4 Tablespoons cold water as needed
Filling
- 2 Cups Whole Milk
- 1 Vanilla bean Pod split down the center
- 6 Tablespoons Granulated Sugar
- 1 Pinch Salt
- 2 ½ Tablespoons Cornstarch
- 5 Large Egg Yolks
- 3 Tablespoons Unsalted Butter
- Fresh Strawberries
- Fresh Raspberries
- Fresh Blueberries
- Apricot Jam For The Glaze
Instructions
Crust
- In a medium bowl, mix the flour, sugar, and salt together. Using a fork or a pastry blender, cut the cold butter into the flour mixture and continue to cut it in until it begins to resemble breadcrumbs.
- Add in the egg yolk and mix as best you can with a fork before adding 2 tbsp of the chilled water. Knead the dough together gently, adding more water if necessary to bring the dough together in a ball.
- Wrap the dough in plastic wrap and allow to chill in the fridge for 30 minutes and preheat the oven to 375° while it chills.
- Once chilled, roll the dough out into a 1/8 inch thick circle. If the dough is cracking as you roll, give it a few minutes to warm up slightly before trying again. To transfer it to the tart pan, roll the pastry up on your rolling pin and unroll it over the tart pan.
- Press the bottom and sides into the pan. Trim the excess dough by rolling the rolling pin over the top of the tart pan. Prick the bottom of the pan a few times with a fork and lay a good-sized piece of parchment in the center of the crust. Add pie weights, uncooked beans, or uncooked rice to the center to weigh down the parchment.
- Bake for 15 minutes, remove the parchment and weights from the crust and then bake for an additional 10 minutes, or until the edges are golden brown. Let cool completely.
Filling
- Use the blunt side of a paring knife to remove the seeds from the vanilla pod.
- Add the milk and vanilla beans to a medium saucepan. Heat over medium heat until the edges of the milk begin to bubble, but not boil.
- While the milk heats, whisk together the sugar, salt, cornstarch, and egg yolks in a medium sized bowl. As soon as the milk starts simmering, remove it from the heat and slowly pour it into the egg yolk mixture while whisking constantly.
- Add the mixture back into the saucepan and return to medium heat. Whisk constantly for 1-2 minutes until it starts to thicken. Lower the heat to low and continue to whisk for 3-4 minutes as the mixture continues to thicken and starts to bubble.
- Remove from the heat and whisk in the butter until it is completely absorbed. Pour the custard into the cooled crust. Immediately cover the hot custard with plastic wrap, being sure the plastic wrap touches the entire surface to prevent a skin from forming.
- Place in the fridge and cool for 4 hours, or overnight.
- Top with fresh berries as desired being sure to cover the whole top of the custard. In a small bowl mix 2 tablespoons of apricot jam mix with 1 teaspoon of water and heat in the microwave for 10 seconds. Mix again before using a pastry brush to brush the glaze across the top of the berries.
- Serve Immediately.
Nutrition
Nutrition information is automatically calculated, so should only be used as an approximation.


Can you substitute vanilla extract for the vanilla bean pod? It looks lovely.
Yes! Let me know how it turns out. It’s so delicious!
Question: If I do not have access to vanilla bean can I substitute pure vanilla?
The recipe looks amazing and I can’t wait to try it!
Yes, that works great! Let me know if you make it and how it turns out. It’s such a great summer recipe!