
This website may contain affiliate links and advertising so that we can provide recipes to you. Read my disclosure policy.

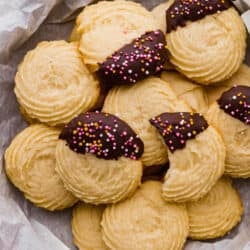
Buttery, tender, and unbelievably light, these homemade Danish butter cookies are so much better than the tinned version. Loaded with flavor, these cookies will melt in your mouth and are so easy to make.
Cookies come in so many different shapes and sizes, and I love them all! If you’re looking for some fun new cookie recipes to try, here are a few of my favorites. Make these fun clothespin cookies or my Mexican wedding cookies. And if you’ve never had a stuffed cookie before you HAVE to try these pumpkin cheesecake snickerdoodles!

Homemade Butter Cookies
Danish butter cookies are an absolute classic holiday cookie but why wait for the holidays when you can make them all year round? With the base of the cookie being butter, sugar, and flour, you know going to love them! This recipe has simple ingredients but it’s bursting with flavors. And the piping of the cookie is a fun added touch to give it great texture. Make these butter cookies for special events or treat your family to the yummiest little cookie just because.
Butter is often times the star of the show in desserts! It’s a neccesary ingredient to achieve rich decadent flavors. Like in this butter pecan cake, these fun Christmas cookies, or in my gooey butter cake! You’ll love all of them!
Ingredients For Butter Cookies
Butter cookies have flavor of shortbread but have a soft tender texture.The sweet butter flavors melt in your mouth and everyone will love them!
- Butter: This cookie recipe uses a large amount and since this is the most dominant flavor, use a quality brand.
- Granulated Sugar: White granulated sugar will do the trick here.
- Vanilla and Almond Extract: Make sure to use extract and not essence flavoring. You could even go the extra mile and use vanilla bean paste or vanilla bean seeds so you get gorgeous black speckles.
- Egg Yolk and Milk: Both are used for richness and they also allow the dough to be soft enough to be piped.
- All-Purpose Flour: Flour gives the cookies structure and these ones just need regular all-purpose flour.
- Chocolate Chips: Melt down and use for dipping!
- Vegetable Oil: The oil helps to thin the chocolate making it easier to dip.
- Sprinkes: Using sprinkles is up to you! Use any colors you would like, but if you bake these at Christmas time then red and green are a must!
How To Make Butter Cookies
This incredibly simple dough is best mixed in a stand mixer. Most definitely my preferred way to mix this thick dough. There’s no need to beat the butter mixture too long as it may soften your piped design on baking. Follow my full instructions below on the recipe card.
Butter Cookies
- Mix the Wet ingredients: In a large mixing bowl beat together the butter, sugar, egg yolk, vanilla, almond extract, and milk together for a few minutes until combined and creamy.
- Add the Flour: Add in the flour and beat until well incorporated. Scrape down the sides and bottom of the bowl and beat again briefly until incorporated.
- Fill the Piping Bag: Fit a sturdy medium-sized piping bag with a large open star piping tip (I used a Wilton 1M) and fill about halfway full with dough. Less is easier to pip with, so don’t overfill the bag. Press a tiny amount of dough under each corner of the parchment paper on the baking sheet to help it stay in place.
- Pipe: With the piping bag perpendicular to the baking sheet, pipe rosettes of dough about 2 inches wide, leaving 2 inches of space between each so they have room to spread.
- Preheat the Oven/ Prepare the Pans: Preheat the oven to 375 degrees Fahrenheit. Line two baking trays with parchment paper and set aside.
- Chill the Dough: Chill the pan of piped dough in the freezer for 25-30 minutes before baking. This helps the cookies maintain their shape while they bake.
- Bake: After the dough finished chilling, bake for 10 minutes, just until the edges of the cookies begin to turn golden brown. Transfer to a cooling rack to cool.
Melt the Chocolate and Decorate
- Melt the Chocolate: Once the cookies have cooled completely, prepare the chocolate by melting the chocolate chips with the vegetable oil in the microwave in 30-second intervals. Stir after each interval until the chocolate is smooth.
- Dip and Decorate: Dip half of each cooled cookie in chocolate, scraping the base on the edge of the bowl, then place on the tray and add sprinkles if you like. Let them set in the fridge for 20 minutes.

Cookie Tips and Tricks
I have lots of tips to help make these homemade butter cookies a success! Be sure to read all these tips and tricks beforehand so that you’re prepared ahead of time.
- The Dough: After adding the flour, beat the dough for 30 seconds or so until it becomes a nice soft dough and everything is fully combined.
- Milk: You can add a little more milk if the dough isn’t soft enough to pipe. However, don’t add too much or they will use their shape as they bake. It should take some pressure to pipe, but should not hurt your hand to do so.
- The Piping Bag: Use a small piping bag. It is a very thick dough and is easier to pipe when you have a small amount to handle at a time.
- Piping: So they keep their shape, pipe them high with the piping bag completely vertical (not at an angle). Hold the tip ½ inch from the baking tray. Use both hands on the bag then press firmly to pipe.
- Designs: Use a piping bag, a cookie press, or freeze into logs to slice and bake the cookies. When you pipe use an open star tip like an Ateco 829. Pipe in a small circle so it becomes a rosette. You can also pipe logs of dough or large stars (without making a circle) then add a glace cherry to the center.
- Hold Down the Paper: Quick trick to hold that baking paper down, dot a little of the dough under the corners and it will assist in holding it in place while you pipe.
- Decorating Tips: Be gentle with the cookies when you’re dipping them as they are very delicate. Add the sprinkles immediately after dipping so that they stick to the cookie.

Storing Leftover Cookies
These homemade butter cookies are good at room temperature or kept in the refrigerator. I also have tips for freezing the dough before baking the cookies.
- In the Refrigerator: Keep leftover butter cookies in an airtight container. Store in the refrigerator for up to 7 days.
- In the Freezer: Freeze baked and cooled cookies in an airtight container for up to 3 months. Perfect for getting ahead if you’re gifting them!
Can I Freeze Extra Dough?
Yes! The dough can be frozen for up to 3 months. Let it thaw overnight in the fridge before piping the dough onto the cookie sheet.

More Amazing Cookie Recipes
For more of the buttery cookie vibe, try my Tea Cakes next! They are soft, simple, and so delicious! Here are a few more you HAVE to try!
Pin this now to find it later
Pin It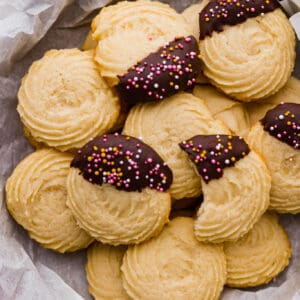
Butter Cookies
Equipment
- medium piping bag
Ingredients
- 1 cup unsalted butter softened
- ⅔ cup granulated sugar
- 1 ½ teaspoons vanilla extract
- ½ teaspoon almond extract
- 1 egg yolk room temperature
- 1 tablespoon milk
- 2 cups + 2 tablespoons all purpose flour
- ¾ cup semi-sweet or milk chocolate chips
- 1 teaspoon vegetable oil
- sprinkles if desired
Instructions
- In a large mixing bowl, beat 1 cup unsalted butter, ⅔ cup granulated sugar, 1 egg yolk, 1 ½ teaspoons vanilla extract, ½ teaspoon almond extract, and 1 tablespoon milk together for a few minutes until combined and creamy.
- Add in 2 cups + 2 tablespoons all purpose flour and beat until well incorporated. Scrape down the sides and bottom of the bowl and beat again briefly until incorporated.
- Fit a sturdy medium-sized piping bag with a large open star piping tip (I used a Wilton 1M) and fill about halfway full with dough. Less is easier to pip with, so don't overfill the bag. Press a tiny amount of dough under each corner of the parchment paper on the baking sheet to help it stay in place.
- With the piping bag perpendicular to the baking sheet, pipe rosettes of dough about 2 inches wide, leaving 2 inches of space between each so they have room to spread.
- Chill the pan of piped dough in the freezer for 25-30 minutes before baking. This helps the cookies maintain their shape while they bake.
- Preheat the oven to 375 degrees Fahrenheit. Line two baking trays with parchment paper and set aside.
- After the dough has finished chilling, bake for 10 minutes, just until the edges of the cookies begin to turn golden brown. Transfer to a cooling rack to cool.
- Once the cookies have cooled completely, prepare the chocolate by melting ¾ cup semi-sweet or milk chocolate chips with 1 teaspoon vegetable oil in the microwave in 30-second intervals. Stir after each interval until the chocolate is smooth.
- Dip half of each cooled cookie in chocolate, scraping the base on the edge of the bowl, then place on the tray and add sprinkles if you like. Let them set in the fridge for 20 minutes.
Video
Nutrition
Nutrition information is automatically calculated, so should only be used as an approximation.


HI MARIE THESE LOOK SO AMAZING THX I WANT TO TRY BUT WITHOUT EGGS IS IT POSSIBLE – THX
Fantastic Banoffie Pie the BEST