This website may contain affiliate links and advertising so that we can provide recipes to you. Read my disclosure policy.
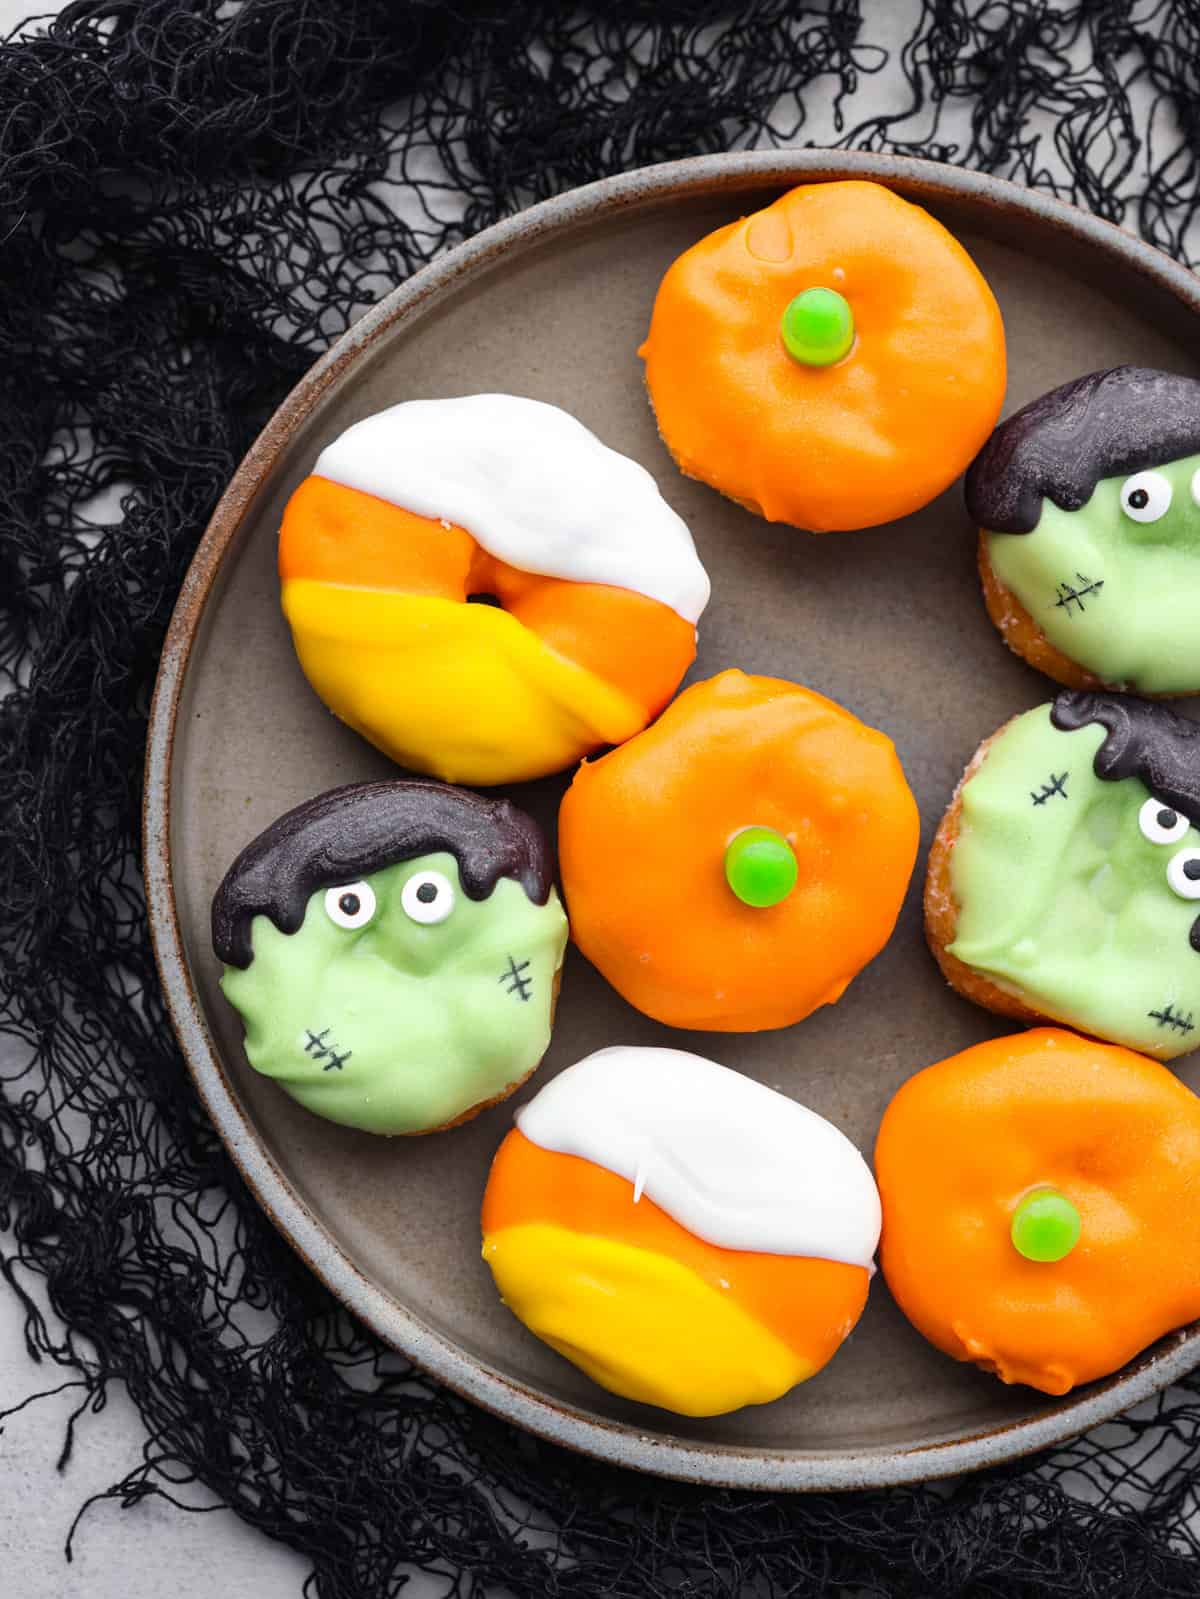
If you are looking for simple and easy instructions on decorating mini Halloween donuts, then you are in luck! Candy corns, pumpkins, and Frankenstein will grace the presence of your Halloween party this year with these decorated donuts!
If you love Halloween treats that are festive and spooky, you have got to try out these cute Halloween Donut Hole Pops, these cute Halloween Cupcakes, and this delightful Halloween Charcuterie Board. Halloween is such a fun holiday and is made that much better with festive food!

Decorating Mini Halloween Donuts
This how-to guide is simple because it starts with some store-bought donuts! You can totally make them from scratch at home (try out this recipe!). But because these take a while to decorate, I like to try and skip a step to make things go a little quicker. And when you see how cute these are, you will want to get right to work!
I did three different ways of decorating donuts because, to me, candy corns, pumpkins, and Frankenstein are classic to Halloween! However, once you understand how I did these, feel free to get some more colors and decorations! You could make ghosts, goblins, witches, and whatever you love! This is such a fun activity to do with your kids during this holiday. My kids adore making their very own monster creations!
Ingredients to Decorate Mini Halloween Donuts
This list of ingredients mostly includes all of the different colors and decorations. You can easily switch these up to make these unique for your family! Check out the recipe card at the bottom of the post for exact measurements.
- Mini Donuts: I bought some of these at the store (get glazed or plain). But you can easily make them at home using this recipe!
- Yellow Candy Melts: You can’t have a complete candy corn donut without some yellow candy melts!
- Orange Candy Melts: Orange is a classic Halloween color! You will use this for the candy corn donuts and the pumpkin donuts!
- White Candy Melts: You will use this color to complete your candy corn donuts. I also think another design of a white ghost would be darling using this color as well!
- Green Candy Melts: I love the color of green candy melts because it is perfect for Frankenstein’s face.
- Black Candy Melts: The black is used for Frankenstein’s hair but could also be used for a cat design or even a cute little witch hat!
- Green Mike and Ike Candies: If you want your pumpkin to really look like a pumpkin, then you need a stem! This goes right in the middle, and I love that it’s edible too!
- Small Eyeball Sprinkles: Look for these on the baking aisle at your local grocery store. Especially around Halloween!
- Edible Black Marker: You will use this to draw on Frankenstein’s stitches.
How to Decorate Mini Halloween Donuts
Before we begin with all of the individual designs, you must get everything set up and ready to go in your kitchen! This will help the process go faster and allow the candy melts to cool perfectly in place on your donuts!
- Prep Counter: Line the counter with parchment paper and cover with a cooling rack.
- Set up Donuts: Lay out ten mini donuts on the cooling rack.
- Melt Candy Melts: Melt the candy melts needed for one design by placing them in a small bowl, one bowl for each color, and microwave at half power for 1 minute. Stir thoroughly and microwave for an additional 30 seconds if needed.

Candy Corn Design
This mini Halloween donut design is so cute and festive. In fact, you could add this (or any of these) onto a Halloween Charcuterie Board and your guests will be fighting about who gets to eat the cute donuts!
- Orange: Add the melted orange candy melts to a piping bag and snip off the end of the bag. Pipe a wide orange stripe right across the middle of the donuts.
- Yellow: Add the melted yellow candy melts to a piping bag and pipe a stripe across the bottom of the donuts, just slightly overlapping the still-wet orange stripe.
- White: Add the melted white candy melts to a piping bag and pipe a stripe across the top of the donuts, just slightly overlapping the still-wet orange stripe.
- Let Set: Carefully lift the donuts and transfer them to the other side of the cooling rack, so they don’t end up with cooled drips of candy melts hanging off them. Let them set completely before serving.
Pumpkin Design
A pumpkin is a classic Halloween (and fall) decoration! This is the easiest of all three mini Halloween donut designs but one that can’t be left out. It’s especially cute when you add in the edible candy stem!
- Dip and Shake: Carefully dip the top of the donuts one by one in the melted orange candy melts. Shake off excess before placing top up on the cooling rack. While the candy melts are still wet, press a green Mike and Ike candy into the center of the donut to act as the stem.
- Let Cool: Let them set completely before serving.
Frankenstein Design
This mini Halloween donut may just be my kid’s favorite! They love adding any sort of eyeballs to decorate things, plus they love piping out his hair!
- Dip: Carefully dip the top of the donuts in the melted green candy melts. Shake off the excess before placing them top up on the cooling rack. While the green candy melts are still wet, place two small eyeball sprinkles just above the center of the donut.
- Pipe Hair: Once the green has set up, add the melted black candy melts to a piping bag and pipe hair along the top third of the donut, just above the eyeballs.
- Add Stitches: Once the black has set up, use an edible black marker to draw a couple of stitches on Frankenstein’s face.

How to Store Donuts
These mini Halloween donuts are so easy to make ahead of time, making them the perfect party treat! Once you have decorated your donuts and let the candy melts set, you can place them in an airtight container. Make sure to use parchment paper in between layers so they don’t stick together. You can store them at room temperature for about 2-3 days.
More Spooky Halloween Treats
I absolutely love Halloween and all of the fun and spookiness that it brings! But we all know that my very favorite part is of course… the food! It’s so fun and playful and I love using it any change that I can get at family gatherings or even school parties and get togethers! Here are a few more of my favorite Halloween recipes that I use every year,

Pin this now to find it later
Pin It
How to Decorate Mini Halloween Donuts (3 Ways!)
Ingredients
- 30 Mini Donuts Glazed or Plain
- Yellow Candy Melts
- Orange Candy Melts
- White Candy Melts
- Green Candy Melts
- Black Candy Melts
- Green Mike and Ike Candies
- Small eyeball sprinkles
- Edible Black Marker
Instructions
- Line the counter with parchment paper and cover with a cooling rack.
- Lay out ten mini donuts on the cooling rack.
- Melt the candy melts needed for one design by placing them in a small bowl, one bowl for each color, and microwave at half power for 1 minute. Stir thoroughly and microwave for an additional 30 seconds if needed.
Candy Corn Design
- Add the melted orange candy melts to a piping bag and snip off the end of the bag. Pipe a wide orange stripe right across the middle of the donuts.
- Add the melted yellow candy melts to a piping bag and pipe a stripe across the bottom of the donuts, just slightly overlapping the still-wet orange stripe.
- Add the melted white candy melts to a piping bag and pipe a stripe across the top of the donuts, slightly overlapping the still-wet orange stripe.
- Carefully lift the donuts and transfer them to the other side of the cooling rack so they don’t end up with cooled drips of candy melts hanging off them. Let them set completely before serving.
Pumpkin Design
- Carefully dip the top of the donuts one by one in the melted orange candy melts. Shake off excess before placing top up on the cooling rack. While the candy melts are still wet, press a green Mike and Ike candy into the center of the donut to act as the stem.
- Let them set completely before serving.
Frankenstein Design
- Carefully dip the top of the donuts in the melted green candy melts. Shake off the excess before placing top up on the cooling rack. While the green candy melts are still wet, place two small eyeball sprinkles just above the center of the donut.
- Once the green has set up, add the melted black candy melts to a piping bag and pipe hair along the top third of the donut, just above the eyeballs.
- Once the black has set up, use an edible black marker to draw a couple stitches on Frankenstein’s face.
Nutrition
Nutrition information is automatically calculated, so should only be used as an approximation.