

This website may contain affiliate links and advertising so that we can provide recipes to you. Read my disclosure policy.
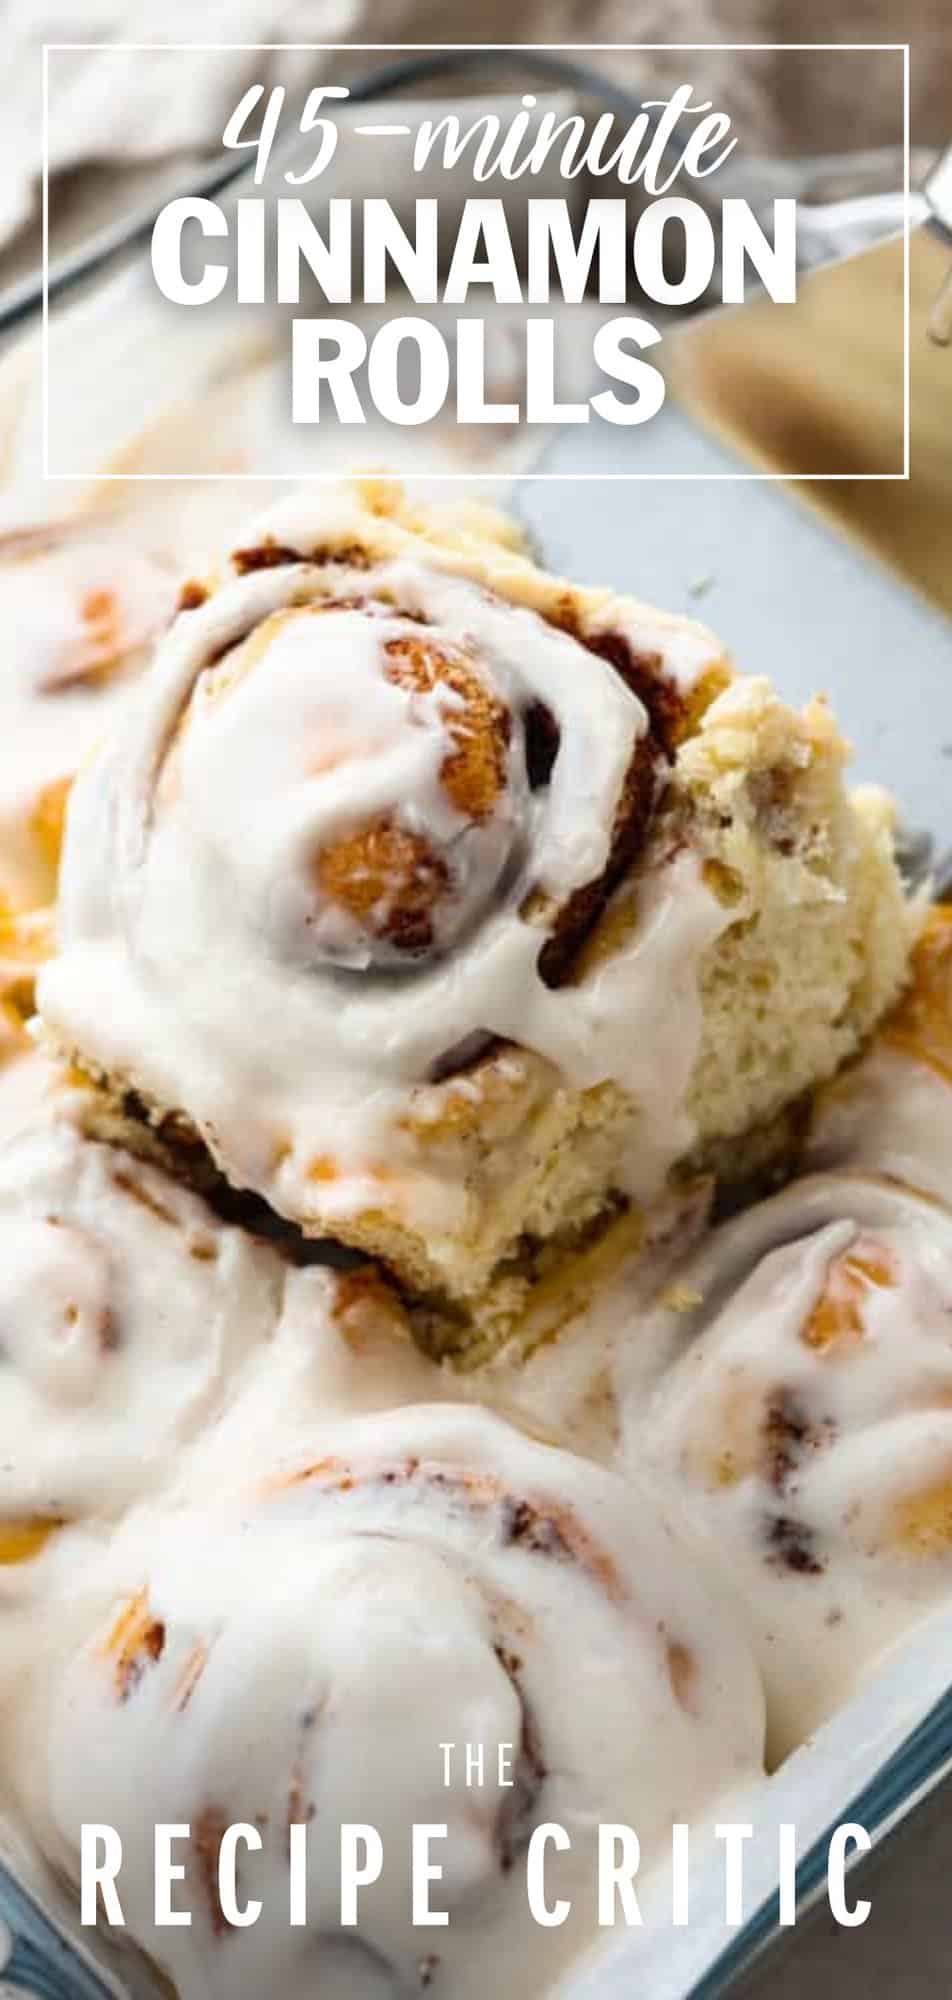
Quick 45 Minute Cinnamon Rolls are made with homemade dough filled with ground cinnamon, and a brown sugar mixture rolled and baked in less than an hour. Drizzle a sweet glaze over the top, making this the VERY BEST breakfast!
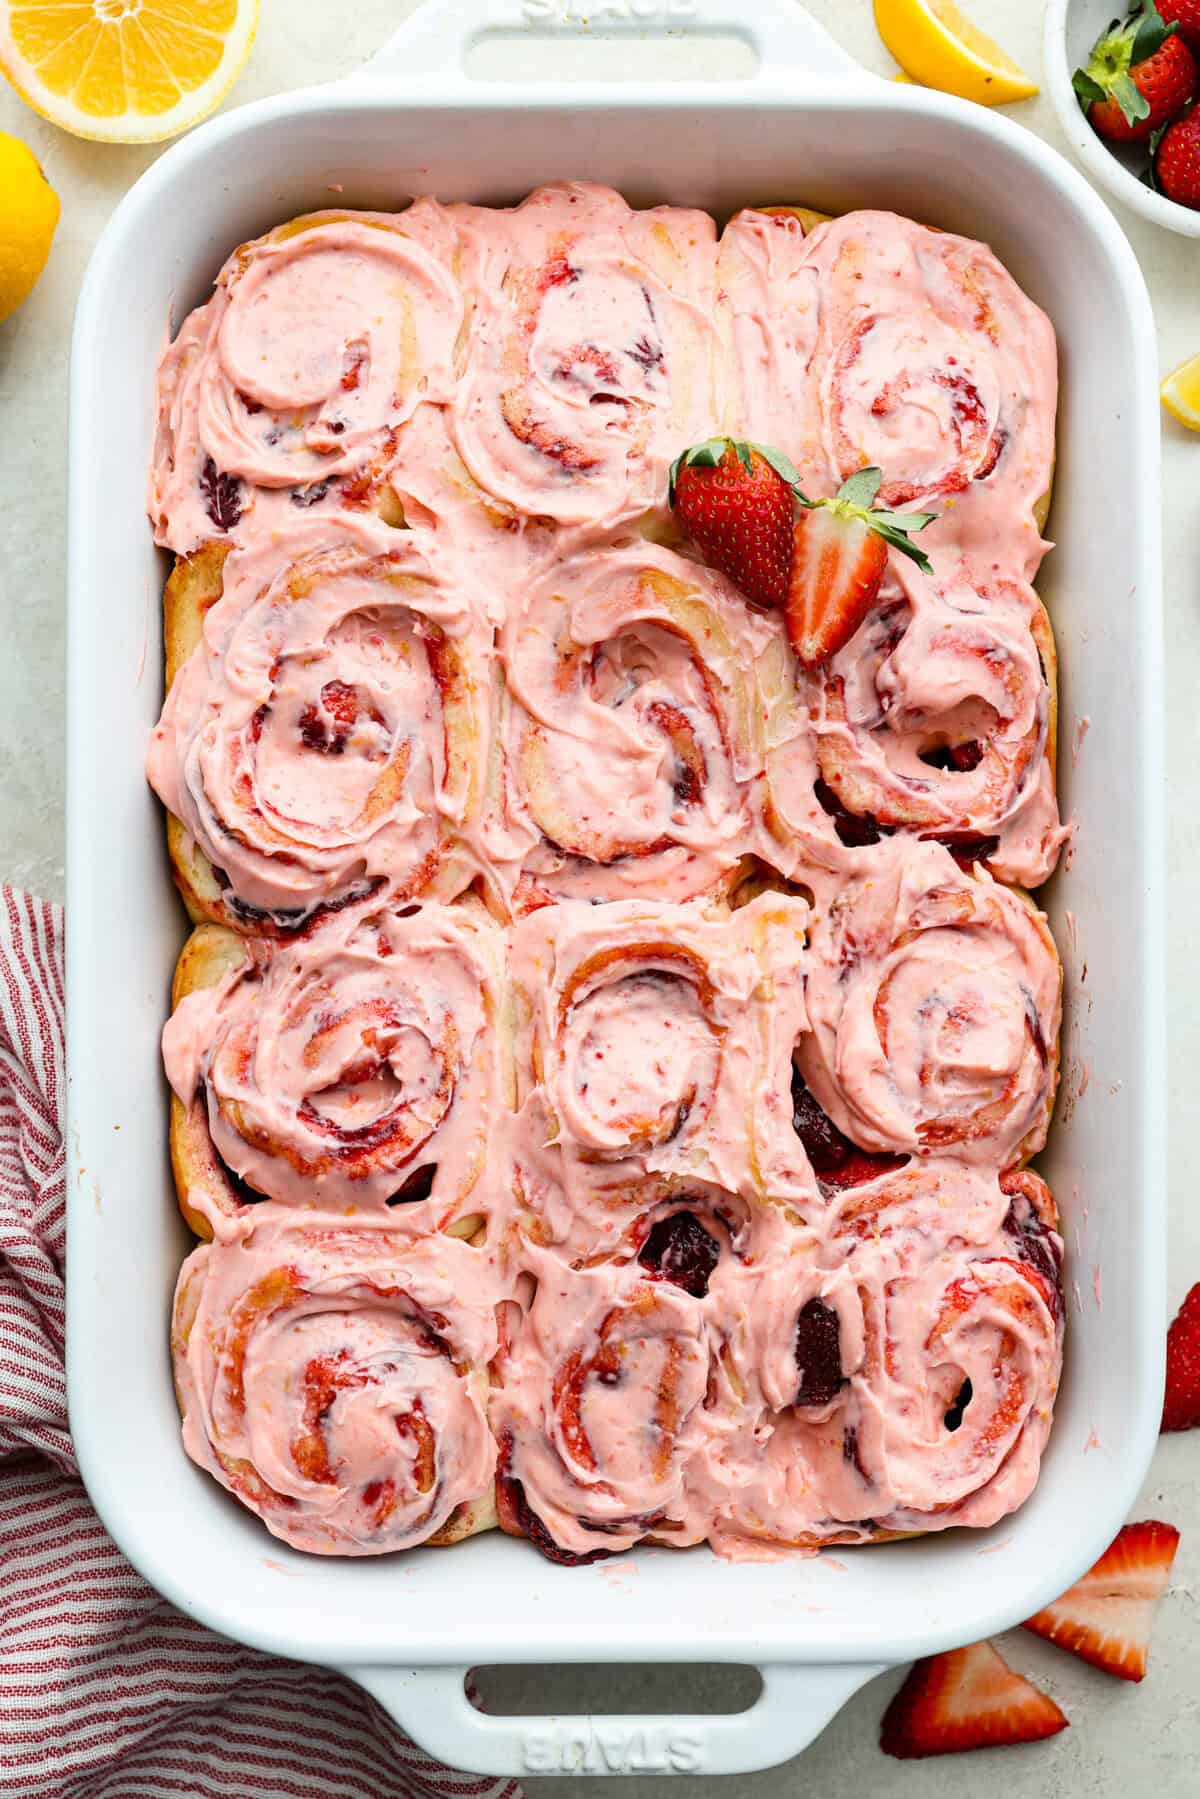
Fluffy and soft cinnamon rolls taste even better than Cinnabon and are ready in just 45 minutes! Try these strawberry cinnamon rolls, these delicious overnight cinnamon rolls, and of course, these tasty caramel apple cinnamon rolls. There are so many delicious ones to try!

A Reader’s Review
Thank you for sharing this recipe. Just tried it. First time I’ve ever made cinnamon rolls from scratch. Very easy and quick to make. These rolls taste sooo goood!
Quick 45-Minute Cinnamon Rolls Recipe
I love cinnamon rolls but sometimes I want them NOW and not in a few hours. Waiting for the dough to rise, then for them to bake… I don’t have time for that! Which is where this recipe comes in handy! This recipe was inspired by my friend Layla at Gimme Delicious!
These delicious cinnamon rolls only take 20 minutes to rise. Then you can put them together and be eating them before you know it! My kiddos love helping me make these in the kitchen! If you are looking for more quick and easy recipes to make for breakfast check out The Best Breakfast Casserole, Starbucks egg bites, or these yummy Perfect Crepes!
What you need to make Quick 45 Minute Cinnamon Rolls
Don’t let the ingredient list scare you! Most of the ingredients are right in your refrigerator and pantry. Check out the recipe card at the bottom of the post for all of the exact ingredient measurements.
Dough
- Flour: This adds thickness and combines it all together.
- Sugar: You need sugar for a sweet taste.
- Salt: The salt adds just enough to help the yeast rise.
- Instant Yeast: This makes it so that your dough can rise at a quicker pace.
- Water: Water softens the dough and creates a sticky, gooey texture.
- Milk: You can use whatever milk you have on hand. I used one percent milk, which gave these a creamy and smooth texture with a hint of flavor.
- Butter: I used unsalted butter in this recipe.
- Large Egg: The egg will combine it all together.
Filling
- Butter: The butter is melted and used to combine the cinnamon and brown sugar tougher.
- Cinnamon: You can’t have a cinnamon roll without cinnamon!
- Brown Sugar: I love how this brings a little sweetness to the cinnamon rolls.
- Heavy Cream: This keeps the cinnamon rolls rich and moist.
Glaze
- Powdered Sugar: It dissolves quickly and makes this icing glaze come together.
- Vanilla Extract: A splash of vanilla makes the perfect blend of icing and tastes SO good!
- Milk: This combines with powdered sugar to form the glaze.
- Cream Cheese: The cream cheese gives a delicious flavor to them.
How to Make Quick 45-Minute Cinnamon Rolls
These cinnamon rolls are SO good and melt in your mouth. Trust me! These cinnamon rolls will not last long and are always a huge hit! Watch the glaze fall into the cracks and in-between the cinnamon rolls getting ooey-gooey. Need cinnamon rolls quicker than 45 minutes? Make my Hawaiian Roll Cinnamon Rolls or my Cinnamon Roll Butter Swim Biscuits.
Dough
- Whisk: In a large bowl whisk the flour, the sugar, salt, and yeast together. Set aside.
- Combine: In a small bowl combine the water, milk, and butter together and heat in the microwave until the butter is melted, about 30-45 seconds.
- Knead into Ball: Use a fork to stir the liquid into the dry ingredients. Add the egg and knead by hand or with a stand mixer for 5-6 minutes, until the dough is no longer sticky. Form the dough into a ball and return to the bowl. Cover and let rest for 5 minutes.
- Preheat Oven: Turn on the oven to 200 degrees Fahrenheit. Spray a 9×9 pan with cooking spray and set aside.
Filling
- Combine: In a small bowl, combine the brown sugar and cinnamon.
- Roll the Dough: Once the dough has rested, dust a clean surface lightly with flour and roll out the dough into a 15×9 inch rectangle.
- Cut: Spread the softened butter over the dough and dust evenly with the cinnamon sugar mixture. Roll the dough up tightly and cut into 9 even pieces.
- Cover: Place the rolls into the prepared pan and cover with plastic wrap or aluminum foil.
- Drizzle: Turn off the warmed oven and place the pan of rolls inside. Let them rise for 20 minutes. After 20 minutes have passed, remove the foil or plastic and drizzle the ¼ cup of cream evenly over the top of the buns.
- Bake: Return the buns to the oven and turn the oven to 375 degrees Fahrenheit. Bake for 15-20 minutes, until the tops of the buns are golden brown
Glaze
- Beat and Combine: Beat the cream cheese, powdered sugar, vanilla, 2 tablespoons milk together until smooth. Add more milk as needed. Let the rolls cool for 20 minutes or so before spreading the glaze over the top.

All Things Cinnamon Rolls
I know how much everyone loves cinnamon rolls! So I’ve rounded up every version, from quick and easy to more advanced homemade! You can find them all in one place! With Lots of tips and tricks!
Tips for Making Quick 45-Minute Cinnamon Rolls
There are several tips for making quick 45-minute cinnamon rolls, but simply following the recipe is straightforward and will help make the best of the best cinnamon rolls! Watch how easily these cinnamon rolls come together.
Dough:
- Liquids: Any liquid, like water or milk, should all be warm to keep the yeast active.
- Rising the dough: For a quicker rise, turn the oven to 200 degrees Fahrenheit. Once it reaches 200 degrees Fahrenheit then turn the oven off and let the dough rise in the oven.
- Yeast: It is best to use active dry yeast. You will want to make sure it is fresh too. If it is old, it doesn’t work as well, and your cinnamon rolls may turn out flat.
- Proof the yeast: You can proof the yeast by simply adding water, yeast, and sugar to it. You can tell good yeast by it being foamy after dissolving in the mixture. If it is not foaming, discard that yeast mixture. Your cinnamon rolls will not rise.
Rolls:
- Rolling out the Dough: The thinner you roll out your dough, the more layers and rings it will have rolled up.
- Rolled Dough: After the dough is rolled into a log shape, use non-flavored dental floss to help you cut the cinnamon rolls. The dental floss is a clean cut and helps the rolled dough from flattening and squishing.
- Spray your wrap: When letting your cinnamon rolls raise or anytime they are covered, spray the aluminum foil or plastic wrap before covering your cinnamon rolls. This will avoid the covering from sticking to the cinnamon rolls.
- Filling Variations: Try pumpkin pie spice to the mixture or use fruit fillings to add a little more flavoring.
- Using a Bread Machine: This will work in a bread machine too! Simply add all dough ingredients into the bread machine. Set the bread machine on the dough cycle. Once it is done, let the dough rise for another 10 to 15 minutes.
Glaze:
- Storing the Icing: go ahead and make the icing ahead of time if you need to. Just keep it covered in the refrigerator for up to 3 days.
- Icing Variations: Change the flavoring on the icing by adding either almond extract or cinnamon to add a little different flavor to your cinnamon rolls.
- Frosting: Let your cinnamon rolls cool for a couple of minutes, but it is best to frost while they are hot, and the frosting can melt on them into each of the layers.

45 Minute Cinnamon Rolls FAQs
Here are a few questions that you may have when making cinnamon rolls. Hopefully, these frequently asked questions and answers can help make these cinnamon rolls easier for you.
- What type of yeast should I use? It is best to use high active yeast when making cinnamon rolls. Traditional yeast does not rise quickly enough compared to the high active yeast.
- What flour is best? All-Purpose flour is best for baking. If you need to use bread flour or gluten-free flour, that will work as well. The texture and taste may be altered a bit using anything besides All-Purpose flour.
- Why didn’t my cinnamon rolls rise? There are a lot of variables on this question. To start, it could simply be your yeast. It may be old and expired and not functioning properly for yeast. If your liquids were not hot when combining could also dilute and kill the yeast. There may not have been enough time for them to rise. If you are baking in the wintertime, you may need a little more time to rise the dough since it is colder than normal. To help, place them in the oven, by a window with sunlight, or simply give them a little more time than an hour.
- Sticky Dough: Add a tablespoon of flour until it is no longer sticky on your fingers.
- Why do my cinnamon rolls seem to fall after baking? Kneading too much can cause the cinnamon rolls to fall apart after baking. I like to use a mixer to do most of the work and prevent me from over-kneading the dough.

How to Store Leftover Cinnamon Rolls
Quick 45-minute cinnamon rolls don’t last long! I haven’t had a chance to even freeze these or store more than 24 hours. They are that good and always a family favorite.
- Bake Ahead of Time: This is always a great idea when making the next day for breakfast. Simply follow the instructions before baking your cinnamon rolls. Once sliced and in a pan to rise. After they have risen, make sure they are covered and placed in the refrigerator for up to 24 hours. Before baking your cinnamon rolls, remove them from the refrigerator and let rise once again for about one hour. Then follow the instructions and bake accordingly.
- To Freeze: These are great for freezing. The glaze can either be left off until warming up or leave it on while it is in the freezer. Following the cinnamon roll instructions, bake, frost, or freeze your glaze separately. Then let cool, cover, and place as a pan or individually wrapped cinnamon rolls in the freezer for up to 1 month. When ready to eat, let your cinnamon rolls thaw overnight on the countertop or refrigerator.
- To Reheat: When ready to warm up, place in the oven for best results and warm up on low until the frosting has melted through, or use a microwave to warm up in 15 to 30-second intervals. Try not to overheat in the microwave, leaving these overcooked and dry.

More Cinnamon Recipes to Try
Cinnamon rolls are the absolute best! They make the best breakfast, brunch, and snack for anyone! My kids go crazy over these and they love them so much! Try some more of these delcious cinnamon recipes. Good luck picking your favorite!
Pin this now to find it later
Pin It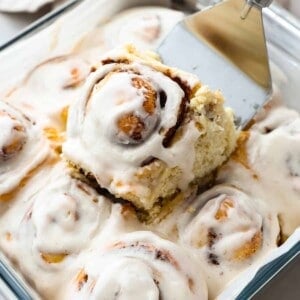
Quick 45 Minute Cinnamon Rolls
Ingredients
- 2 and 3/4 cups all-purpose flour
- 1/4 cup granulated sugar
- 3/4 teaspoon salt
- 1 package instant yeast (1 packet = 2 and 1/4 teaspoons)
- 1/2 cup water
- 1/4 cup milk
- 2 tablespoons unsalted butter
- 1 large egg
Filling:
- 1/4 cup salted butter softened
- 2 tablespoons ground cinnamon
- 1/2 cup brown sugar
- 1/4 cup heavy cream for drizzling over buns before baking
Glaze:
- 1 cup powdered sugar
- 1 teaspoon vanilla extract
- 2-3 tablespoons milk
- 4 ounces cream cheese room temperature
Instructions
Dough
- In a large bowl whisk the flour, the sugar, salt, and yeast together. Set aside.
- In a small bowl combine the water, milk, and butter together and heat in the microwave until the butter is melted, about 30-45 seconds.
- Use a fork to stir the liquid into the dry ingredients. Add the egg and knead by hand or with a stand mixer for 5-6 minutes, until the dough is no longer sticky. Form the dough into a ball and return to the bowl. Cover and let rest for 5 minutes.
- Turn on the oven to 200 degrees fahrenheit. Spray a 9×9 pan with cooking spray and set aside.
Filling
- In a small bowl, combine the brown sugar and cinnamon.
- Once the dough has rested, dust a clean surface lightly with flour and roll out the dough into a 15×9 inch rectangle.
- Spread the softened butter over the dough and dust evenly with the cinnamon sugar mixture. Roll the dough up tightly and cut into 9 even pieces.
- Place the rolls into the prepared pan and cover with plastic wrap or aluminum foil.
- Turn off the warmed oven and place the pan of rolls inside. Let them rise for 20 minutes. After 20 minutes have passed, remove the foil or plastic and drizzle the ¼ cup of cream evenly over the top of the buns.
- Return the buns to the oven and turn the oven to 375 degrees fahrenheit. Bake for 15-20 minutes, until the tops of the buns are golden brown.
Cream Cheese Glaze
- Beat the cream cheese, powdered sugar, vanilla, 2 tablespoons milk together until smooth. Add more milk as needed. Let the rolls cool for 20 minutes or so before spreading the glaze over the top.
Video
Notes
Nutrition
Nutrition information is automatically calculated, so should only be used as an approximation.


Made these cinnamon rolls for the first time for my husband for Father’s Day breakfast. I used to make cinnamon rolls for my dad on Father’s Day with an old family recipe that took a very long time. This recipe was fantastic! Quick, easy, and delicious!!!
But then my gears started going… the bread reminded me so much of my old family recipe that was our go to for many things- pizza crust, dinner rolls, garlic bread, cinnamon rolls. (It was an old basic white bread recipe we used.) well, this recipe works great for them all too. I make AMAZING pizza crusts with this- less sugar, olive oil for butter, dinner rolls, garlic bread, and I can’t wait to figure out more things to make with it! I’ve made this recipe at least 3 times a week or more since Father’s Day. Thank you so much!!!! I’m in love! Culinary heaven! ❤️?
Thank you so much for sharing!! That is awesome all your combinations and great ideas!! I really appreciate it! Thanks so much!!
I made these, followed recipe exactly, and tgey were amazing! I live in Mexico and I only have a countertop oven and they turned out perfectly. Thanks!
That is awesome! Thank you so much for sharing!! I am so glad they turned out! XOXO
I was so excited about making these! First time ever baking anything with yeast in it. I don’t know where I went wrong but the dough was soooooo sticky I had to add more flour. And then they didn’t rise any and were very dense. Not pretty and fluffy like yours! I’m determined to get this right. Making again this weekend.
OH bummer! I am so sorry it didn’t work out the first time. I hope that it works out for you next time. I am not sure what went wrong. XOXO
Make sure your yeast is fresh and that your liquids aren’t to hot. Your liquids should be warm, not hot to the touch. My first bread rolls turned out like rocks. Buy new and try again! It’s worth it
Just made these for the second time! However, we were out of milk and I’d already measured the dry ingredients. Substituted sour cream and they were delicious. They seem to take me about an hour total to make, but still the quickest homemade cinnamon rolls I’ve ever made! And the kids adore them.
WOW!! That is awesome!! Thanks for sharing!!
Made these this morning for Mothers Day! ? They turned out GREAT! Super awesome recipe. I made a little more filling & icing because I love my cinnamon rolls bursting with each. Lol. Other than this I didn’t change anything with the recipe & followed exactly. Family LOVED them. Mom, Grandma & kids happy. ? Super easy to make. Gooey & dough was perfectly soft. I will only use this recipe in the future & double batch it! Thanks!
Oh, that is wonderful to hear! I am so happy your Mothers Day was great! You all deserve it! Happy Mother’s Day! Enjoy those cinnamon rolls! Xo
Your Recipe Critic,
Alyssa
These turned out FANTASTIC! I have made many 45 minute rolls before as I am a teacher and constantly looking for quick recipes. These are by FAR the BEST I have come across! They rise great. they are light and fluffy and delicious!
My one tip might be they are a bit cinnamon-y for me. So I will cut it down from 2 Tbsp. to 1 and 1/2. I also will up the brown sugar from 1/4 c. to 1/2 c. Thank you so much for the great recipe!!!
Wow, that is such a sweet compliment and so nice of you to say! Thank you for sharing! Those are great tips to know! Xo
Your Recipe Critic,
Alyssa
My friend gave me this link to try your cinnamon rolls (she said hers turned out great) so I can’t wait to try them. However, I do have a question – the recipe called for unsalted butter (in the rolls and filling), with the inclusion of a tsp of salt into the batter. I have 10 sticks of salted butter at home (as that is what I usually bake with). Would it ruin the recipe to use the salted butter I have (and omit the tsp of salt)? If it won’t rise or come out right, I’ll buy unsalted butter, but I’d love to use what I have already, if it’ll turn out. What do you think?
Hi Megan!
When I looked up salted butter and unsalted butter this is what I found: The salt content of regular butter varies by manufacturer, so using unsalted butter is a means of controlling how much salt is in baked goods. If you’re going to substitute salted butter for unsalted butter, reduce the amount of salt in the recipe by 1/4 teaspoon per 1/2 cup of butter. I hope this helps! Thanks for your question! Xo
Your Recipe Critic,
Alyssa
Recipe worked well, and the rolls were surprisingly soft and puffy, for such a short rise time. It actually took me 1.5 hours from prep to table (I had made a 1 hour cinnamon roll recipe earlier in the week that took close to 2 hours, so this recipe brings me closer to the “quick” I have been searching for!), but still very tasty for such an accelerated recipe. This recipe is definitely a keeper!
Awesome! That is great to hear!
The Recipe Critic
Alyssa
Best cinnamon rolls ever! For the filling I used extra butter and heaping measurements of the brown sugar and cinnamon because we like our sweets extra sweet. I was a little worried when the dough turned out very sticky and didn’t rise very much in the greased bowl, but the cut rolls rose beautifully in the 200 degree oven and turned out fantastic! Also, as others have found they took closer to 1 1/2 hours from start to finish, but who cares! Still much easier than many other recipes I found online and well worth it. Thanks for sharing your recipe!
Makes a really nice dough. I’ll definitely make these again. However, against my better judgment I followed the recipe and left the buns in after rising and while the oven heated to 375. The tops burned a bit. Next time I’ll pull them out while the ovens heating. Otherwise it’s a great recipe!
I haven’t made this yet and was wondering if you should pull them out while the oven heats to 375, or leave them in. Thanks for posting this, so I know to pull them out!
Preheat the oven to 200 degrees and turn off after 10 minutes or just before placing rolls in oven. After the dough has rested for 5 minutes, roll it out in a 15×9 inch rectangle. Spread the softened butter on top. Mix together the cinnamon and sugar and sprinkle it all over the dough. Roll up the dough tightly and cut into 9 (large) even piece. Place in a lightly greased 9-inch or square pan (or cut into 12 small pieces and place in a 9×13 pan) and lightly cover with aluminum foil or plastic wrap. TURN OFF the oven and place the cinnamon buns in the oven to rise for 20 minutes. Keep the buns in the oven REMOVE THE FOIL OR PLASTIC) and turn on the oven to 375F. Bake the cinnamon rolls for 15-20 minutes or until golden.
Hope that explains it for you! Happy Baking!
Your Recipe Critic,
Alyssa
Can you let this sit & rise overnight and then back in the morning?
Whoa! I tried these for the first time and it was a hit. Thanks Layla
I’ve never made any kind of yeast bread from scratch and this was very easy and came out perfectly! Everybody loved them. They were fluffy, moist, soft, everything you expect from a cinnamon roll.
My only question as a newbie was: When rolling, do you roll up starting on the long side or the short side? I rolled from the short side and it worked really well. I also had two that didn’t have a lot of filling because I didn’t realize I had to get the stuff all the way to the edges.
Can’t wait to try these!!! They look so good!
Amazing recipe!! The only I’m gonna use now. 🙂 I doubled the recipe which made 24 very large rolls! I was actually shocked at how much they rose! They were soft and perfect! My siblings devoured them in one sitting. 😛
My husband says these are some of the best cinnamon rolls he has ever tasted.
These are absolutely amazing! They were quick and easy. I’d like to let them rise just a big more and in my oven they needed a lot more time to get golden brown, but they are light and full of flavor and not too sweet, they truly are perfect. And so so so easy to make!