
This website may contain affiliate links and advertising so that we can provide recipes to you. Read my disclosure policy.

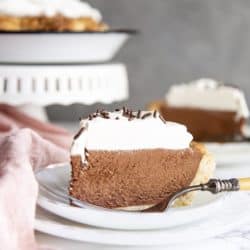
A flakey crust is filled with a decadent, dreamy, creamy, chocolate filling and topped with pillows of cream for this irresistible French Silk Pie. The filling is so smooth and rich, and then encased in a buttery crust. It’s a crowd pleaser where ever you serve it!
Add this show-stopper dessert to others like Better Than Anything Cake, Lemon Tart with a Buttery Shortbread Crust and Easy Tiramisu as one that will disappear fast!

Homemade French Silk Pie
This pie truly is a chocolate lovers dream pie. The rich chocolaty filling can be adjusted to your level of chocolateness. And because we heat the eggs, you don’t have to worry about eating raw egg. You can just enjoy the velvety smoothness without a care in the world.
Serve this at any holiday or special occasion and watch your friends and family turn you into a hero. Everyone loves a good dessert made with love…and chocolate….and cream!
Baking the Crust
- Flour: All purpose flour is best, so it holds its structure
- Sugar: Helps as a binder and browning
- Salt: Gives it flavor
- Butter: Butter gives it that flakey goodness
- Cold Water: To add moisture
Ingredients for Creamy Dreamy Mousse Filling
- Heavy Cream: Don’t substitute
- Powdered Sugar: Using powdered sugar gives sweetness without graininess.
- Unsweetened Baking Chocolate: Or unsweetened chocolate bar
- Bittersweet Baking Chocolate: Or chocolate bar
- Eggs: Creates the binder and light fluffiness
- Sugar: Gives the sweet to the bitter
- Butter: soften the butter to room temp
- Vanilla: Divided
Whipped Cream Ingredients
- Heavy Cream: You’ll want it to whip up nice and high
- Powdered Sugar: Dissolves easily
- Vanilla: Add the sweet flavor
- Garnish: Chocolate curls

Making the Best French Silk Pie Crust
- Whisk: In a small bowl mix the flour, sugar, and salt with a whisk
- Food Processor: Place the flour mixture in the food processor and add cold cubed butter. Pulse several times till mixture is pea or bean sized.
- Water: Turn the processor on and drizzle the cold water over the dough mixture through the water hole. Add enough water for the dough to pull together. Stop and scrape the bottom to make sure the flour is all incorporated.
- Refrigerate: Turn the dough out onto the counter and form into a disk. Wrap in plastic wrap and place in the fridge for at least an hour.
- Roll: Remove from fridge and roll into a circle about 2 inches larger than your pie dish. Use extra flour to keep dough from sticking to the counter and roller.
- Form: Place the dough over the pie dish, and lightly press the dough into the bottom and side of the pie dish. Trim excess dough leaving just enough to fold under and create a fluted edge.
- Cover: Cover and refrigerate for another 15-30 min or you can freeze for later.
- Parchment: Using a fork poke steam holes in the bottom of the pie dough and on the sides.Place a large piece of parchment over the dough and place pie weights or dry beans on top to fill the whole pie crust. Make sure the parchment is large enough to cover the edges of the crust entirely.
- Blind Bake: Place the pie dish on a large baking sheet and bake at 425 for 25 min. Carefully remove the pie and remove the parchment and pie weights. Then bake for another 5 min. Place on a cooling rack to cool.
Mousse Filling
- Melt: In a double boiler melt the chocolate and set aside to cool.
- Heat: In another or double boiler or in a small saucepan set over low heat, heat the eggs and 1/2 cup sugar till mixture reaches 160 degrees F. Whisk constantly so the eggs don’t cook, about 7-10 min.
- Remove: Remove from heat and add it to the melted chocolate whisk until completely mixed.
- Beat: In a stand mixer add the heavy cream and 1 tablespoon of powdered sugar, beat on medium speed. Stream in 1/2 teaspoon of vanilla and continue to beat till stiff peaks form. Scoop into a small bowl and refrigerate till needed.
- Fluffy: In the same mixing bowl add the softened butter and the remaining 1/2 sugar and beat till light and fluffy, about 2-3 minutes. Ad the cooled chocolate and egg mixture, beat till completely smooth, another 2-3 minutes.
- Fold: Fold in the whipped cream and spread the mixture evenly into the completely cooled pie shell. Chill for at least 2 hours before serving.
Whipped Cream Topping
Add whipping cream and powdered sugar in a stand mixer and beat on medium speed. Stream in the vanilla and beat until stiff peaks form. Spread on top of pie and add garnishing as desired.

Making French Silk Heavenly
There are a few tips for this decadent French silk pie!
- Chocolate: This recipe creates a decadent rich chocolate flavor,if you’d like a lighter chocolate taste switch out the unsweetened for bittersweet and then switch the bittersweet for semi-sweet. I do not recommend using chocolate chips. Use a fine baking bar such as Bakers or Ghirardelli or another quality chocolate bar. You won’t regret it.
- Cream: Because you need to really whip the cream and create perfect fluffiness, I don’t recommend using substitutions for the Heavy Cream.
- Pie Crust: You can use a premade pie crust to speed the process. Bake as directed on package. You can also make an chocolate cookie crust if you desire as well.
- Eggs: Because we bring the eggs up to a safe 160 degrees, you don’t have to worry about eating raw eggs! So serve to anyone and everyone. Be sure heat it slowly however so it doesn’t cook.
- Just Beat it: To get a heavenly smooth silky texture to your chocolate filling you need to beat it more than you think you do. Beating the process for a long time ensures that the sugar dissolves and butter and eggs become light and fluffy.

Storing and Freezing Your Pie
You’ll love the fact that you can make it ahead of time and freeze it for later too.
- Make ahead:This definitely takes time to make, but it’s so worth it and what makes it better is you can make it ahead of time. Make and refrigerate up to 2 days ahead of time. Just don’t put the whipped topping on top till ready to serve.
- Freezing: Make the pie as directed but don’t put the whipped topping on, refrigerate for 2 hours. Cover completely with plastic wrap, then cover with foil, and freeze up to 2 months. Thaw in the fridge overnight. Make whipped topping and garnish as desired.

More Chocolate Desserts to Conquer
Because chocolate is always the right answer to what’s for dessert.
- brownie
- Chocolate Lava Cake
- Death by Chocolate Cheesecake
- Flourless Chocolate Cake
- Deep Dish Skillet Brownie Cookie
Pin this now to find it later
Pin It
French Silk Pie
Ingredients
Pie Crust
- 1 ½ cup all-purpose flour
- 2 tablespoons granulated sugar
- ¼ teaspoon teaspoon kosher salt
- 5 ounces cold and cubed unsalted butter
- 2-4 tablespoons cold water
Chocolate Mousse Filling
- ¾ cup heavy whipping cream
- 1 tablespoon powdered sugar
- 3 ounces unsweetened baking chocolate
- 3 ounces bittersweet baking chocolate
- 3 large eggs
- 1 cup granulated sugar divided
- 12 tablespoons unsalted butter softened to room temperature
- 1 ½ teaspoons vanilla extract
Whipped cream topping
- ¾ cup heavy whipping cream
- 2 tablespoons powdered sugar
- ½ teaspoon vanilla extract
Garnish
- Chocolate curls shaved chocolate, cocoa powder, chocolate sprinkles
Instructions
Make the pie crust
- Add 1 ½ cup all-purpose flour, 2 tablespoons granulated sugar, and ¼ teaspoon teaspoon kosher salt to a small mixing bowl and mix thoroughly with a whisk. Transfer the flour mixture to a food processor fitted with the dough blade. Add 5 ounces cold and cubed unsalted butter to the flour mixture, pulse several times until the butter is about pea size. Variations in size are okay.
- Turn the food processor to the “on” position and drizzle 2-4 tablespoons cold water over the dough mixture through the water hole. As soon as the dough starts to pull together, turn the food processor off. You may need to stop the food processor in between and get a spatula to mix up the flour at the bottom.
- Turn the dough out on the counter or cutting board, and shape into a disk. Wrap in plastic and rest in the refrigerator for at least an hour.
- Take the disk of pie dough out of the fridge and roll it into a circle about 2 inches larger than your pie dish. Use extra flour to keep the dough from sticking to the counter and roller.
- Carefully place the dough over the pie dish, lightly press the dough into the bottom and side of the pie dish, and let the excess dough hang over the side. Trim the excess dough, leaving just enough to fold under and create a fluted edge.
- Cover the pie dish with plastic wrap and keep refrigerated, or freeze (preferred), for 15-30 minutes.
- Preheat the oven to 425 degrees Fahrenheit. Remove the pie crust from the freezer and use a fork to poke steam vents on the bottom of the pie dough and on the sides.
- Place a large piece of parchment paper over the frozen pie dough. Place pie weights on top or pour dry beans on top to fill the whole pie crust. Make sure the parchment is large enough to cover the edges of the crust entirely.
- Place the pie dish on a large baking sheet. Bake the pie crust for 25 minutes with pie weights or beans, then carefully remove the parchment paper along with the pie weights and bake for another 7-10 minutes until the crust is golden.
- Remove the pie crust from the oven and let it cool completely on a wire rack.
Make the filling
- Melt 3 ounces unsweetened baking chocolate, and 3 ounces bittersweet baking chocolate in a double boiler or in a heatproof bowl set over a steaming pot of water. Set aside to cool.
- Heat 3 large eggs and ½ of the 1 cup granulated sugar in a double boiler or in a small saucepan set over low heat until the mixture reaches 160 degrees Fahrenheit, whisking constantly so the eggs don’t cook. This will take about 7-10 minutes. Take it off the heat and add it to the slightly cool melted chocolate and whisk until thoroughly incorporated. Set aside to cool.
- Add ¾ cup heavy whipping cream and 1 tablespoon powdered sugar to a stand mixer bowl, beat on medium speed. Stream in 1 ½ teaspoons vanilla extract and continue beating until stiff peaks form. Scoop it into a small bowl and refrigerate until needed.
- In the same mixing bowl, add 12 tablespoons unsalted butter and the remaining ½ of the 1 cup granulated sugar and beat until light and fluffy, about 2-3 minutes. Add the cooled chocolate and egg mixture, beat another 2-3 minutes until completely smooth.
- Fold in the whipped cream and spread the mixture evenly into the completely cooled pie shell. Chill for at least 2 hours before serving.
Make the whipped cream topping
- Add ¾ cup heavy whipping cream and 2 tablespoons powdered sugar to a stand mixer bowl, beat on medium speed. Stream in ½ teaspoon vanilla extract and continue beating until stiff peaks. Spread the whipped cream on top of the pie and add garnishing as desired.
Notes
For a sweeter chocolate filling, you can use all bittersweet baking chocolate instead, or even semisweet baking chocolate.
Use baking bars or baking wafers or your favorite eating chocolate, don’t use chocolate chips.
After removing the pie weights and before putting the pie crust back into the oven, if you notice that that edge is already getting too brown, put a pie shield or a few strips of foil around the edge to prevent burning.
Nutrition
Nutrition information is automatically calculated, so should only be used as an approximation.