This website may contain affiliate links and advertising so that we can provide recipes to you. Read my disclosure policy.
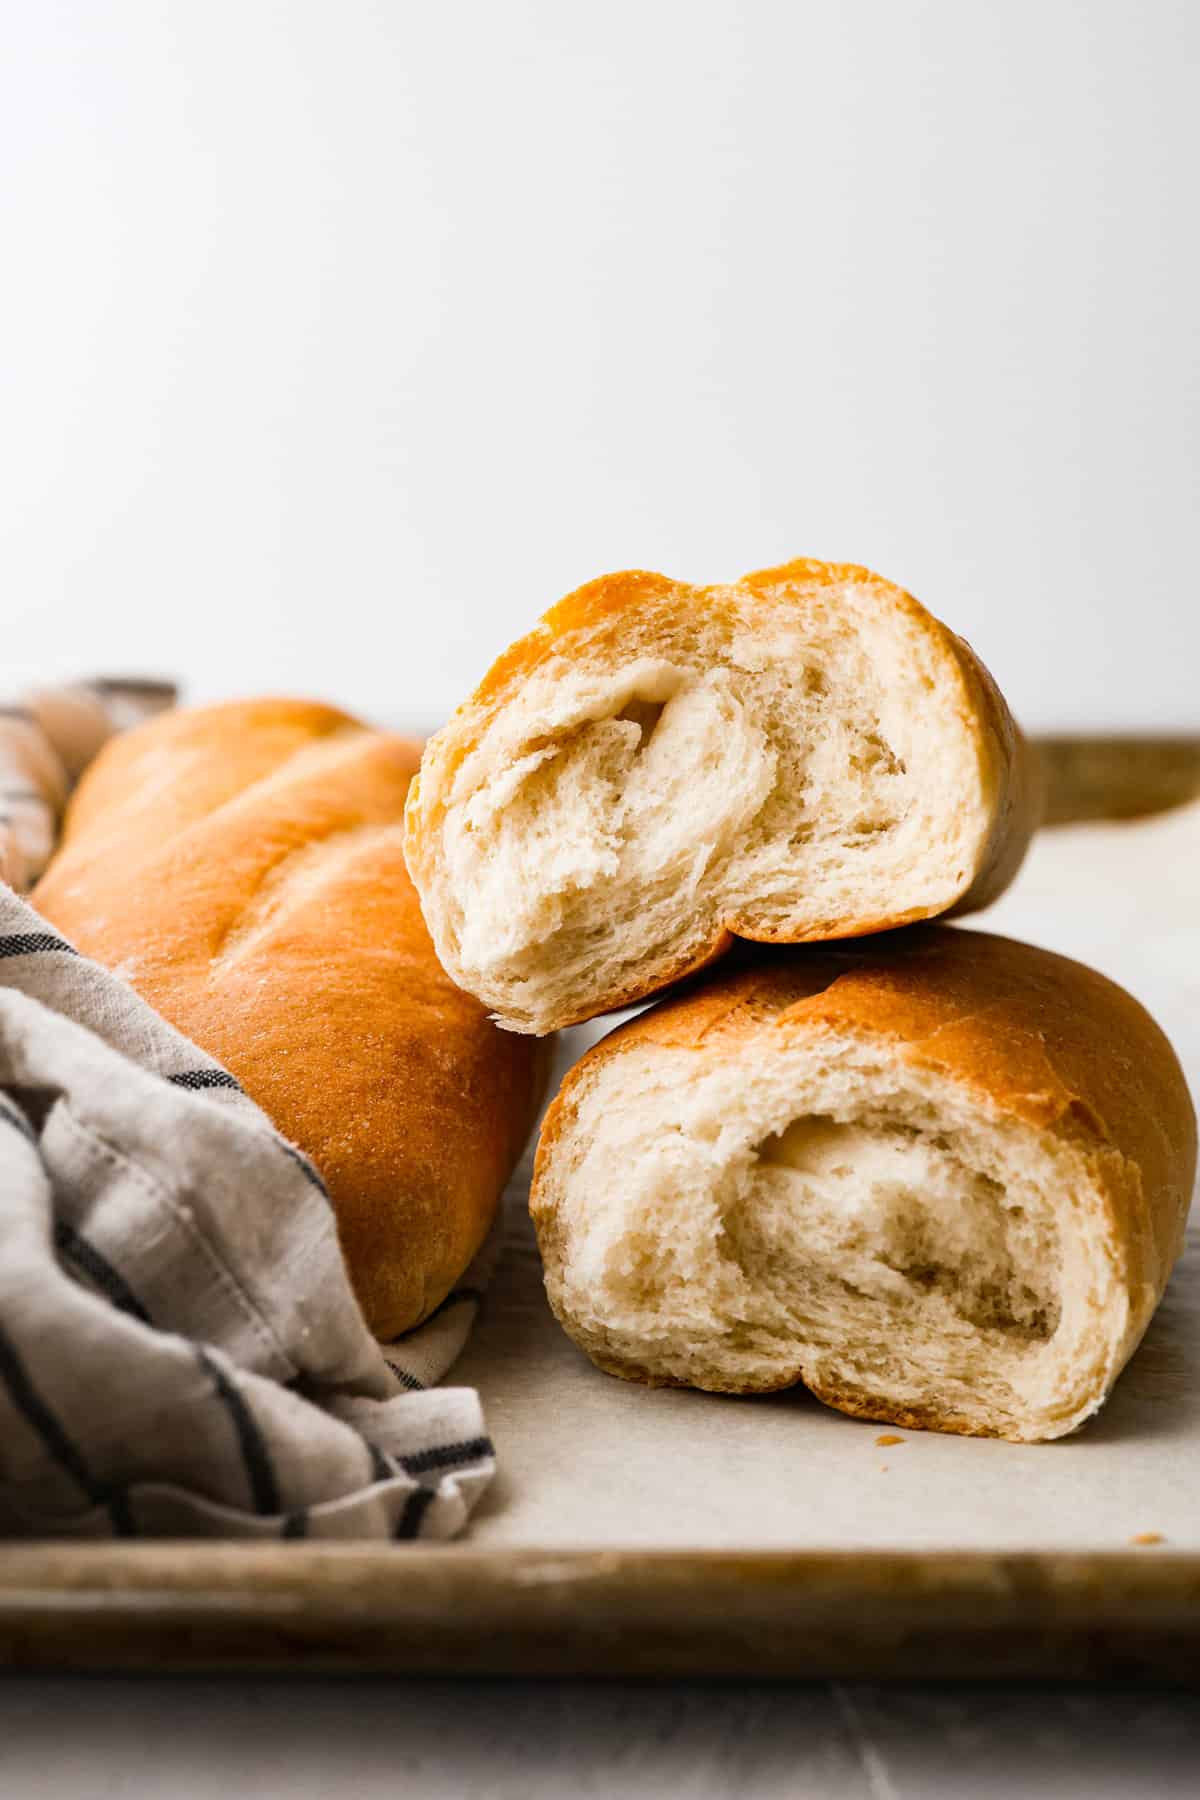
Skip the bakery and make your own artisan Italian bread at home! This bread is perfect for subs and sandwiches of every kind. Besides, no one can resist the smell of fresh bread hot out of the oven!
I just love making bread at home! Yeasted breads used to intimidate me, but after lots of practice I have all the tips you will need to have the confidence to tackle any bread recipe. If you still feel like making a few no-yeast bread recipes first, then you’ve got to try this easy Beer Bread, this yummy No Yeast Flatbread, and Soda Bread.

Artisan Italian Bread
If you love getting your hands in some dough, this Italian bread recipe is for you! It’s so easy, and the end result is a fluffy inside with a slightly chewy outside. There is just nothing that tastes better than homemade bread! It’s totally worth the extra effort to make bread that is better for you, but also so much better tasting than what you can find at the grocery store. I grew up eating my grandma’s sandwich bread, and there is still nothing like it!
If you’ve been to Subway and ordered your sub on Italian bread, then you kind of know what to expect with this one. It’s similar to that, but way tastier! It reminds me of Cuban bread, but with a few differences in the method of making it. I really like this recipe because it’s as easy to whip up as a pizza dough, but the end result is a super versatile loaf that you can use for sandwiches, toast, and whatever else sounds good!
Ingredients
I just love how simple the ingredients are for this Italian bread dough. It’s just the basics and nothing more. This recipe calls for bread flour, which has a higher protein content than all purpose flour. If you want to use all purpose, I have a tip below in the tip box for how to adjust the recipe for that. You can find the measurements below in the recipe card.
- Active Dry Yeast: Use warm water to activate it, it should only take a few minutes to get frothy.
- Warm Water: To help the yeast activate and come alive.
- Sugar: Sugar helps the bread rise better and to give it more flavor. You could use honey instead.
- Bread Flour: You could use wheat flour or all-purpose flour instead, but I talk about how to do that successfully down in the tip box. Bread flour has a high protein content which makes it different than all-purpose.
- Salt: Brings out all of the lovely flavors.

Italian Bread Recipe
Yes, you can absolutely make this recipe by hand! All you need is a large mixing bowl and a wooden spoon. Anything that mentions the bowl of a stand mixer, just add it to your mixing bowl instead. When you knead by hand, try not to add too much extra flour, you don’t want your bread to be dry.
Make Dough
- Activate Yeast: In the bowl of your stand mixer, mix your yeast, warm water, and sugar. Allow the mixture to sit until the yeast becomes frothy, about 5 minutes.
- Mix Dough: Once the yeast is ready, add the flour and salt to the bowl. Using the dough hook attachment, mix on low speed until the dough comes together, about 3-4 minutes. Increase the speed to medium and mix for 3-5 minutes to develop the gluten.
- Rest: Once the dough is done mixing, remove it from the mixer and place it into an oiled bowl. Cover and let the dough rest until it has doubled in size, about 1 hour. Prepare a baking sheet by lining it with parchment paper.
- Pound and Fold: Dump the dough out onto a floured surface and pound the air out of it, fold it back in on itself into a round and place it back into the bowl, seam side down. Cover and let rest for another 30-40 minutes.
Shape and Bake
- Cut and Shape: Once the Italian bread dough has rested and risen back up again, dump it out onto a lightly floured surface and degas it again. Cut dough in half and toll them both up into 10 inch baguette-like loaves. Place the loaves onto your prepared baking sheet, seam side down and cover them. Preheat your oven to 375 degrees Fahrenheit.
- Proof and Bake: Proof your loaves until they are nearly double in size about 30-45 minutes. Once the loaves are ready, score your loaves (I did two diagonal slits on each one) and bake them for 25-30 minutes. They should have a light golden brown crust and temp out to 190 degrees fahrenheit.
- Cool: Remove the loaves from the oven and allow them to cool to room temperature.

Tips for Making Homemade Italian Bread
I like to make bread, so I always have bread flour on hand. If you don’t, here are some tips for using other flours in this Italian bread recipe.
- Using A Different Flour: I know you are all thinking it! If you don’t bake bread frequently, you might not have bread flour on hand. What I will say is this- I haven’t tested this recipe with another flour. I can tell you from experience that sometimes substituting 1:1 bread flour for all purpose doesn’t always turn out. You should be able to use the same amount of flour with a little less water, or add extra flour if the dough seems way too sticky. Bread flour has a higher protein content than all-purpose, so it sucks up more water. Don’t be afraid to experiment until you get it right!
- Whole Wheat Italian Bread: If you want to make this loaf whole wheat, I would recommend using half all purpose and half whole wheat. Using all whole wheat may cause a really dense and dry loaf that doesn’t really hit the spot.

Storing Leftovers
Homemade bread doesn’t have any preservatives in it, so it doesn’t last quite as long as store bought bread. Here are my tips for keeping your bread fresh for as long as possible.
- On the Counter: Make sure your bread has completely cooled for at least a few hours before storing. You can store in a bread bag or bread box for a few days, or transfer bread directly to a plastic bag for up to a week.
- In the Refrigerator: Store your bread in the refrigerator in an airtight bag for up to two weeks.
More Bread Recipes
I am addicted to making homemade bread! We rarely buy bread from the store because I enjoy the process so much. Here are a few of my favorite recipes that are perfect for beginners or seasoned pros!

Pin this now to find it later
Pin It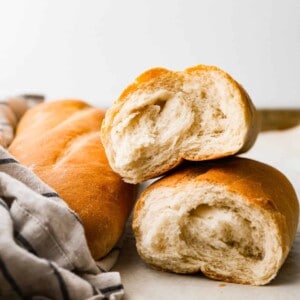
Italian Bread
Ingredients
- 1 package active dry yeast or 2 ¼ teaspoons
- 1 ¾ cups warm water
- 1 teaspoon sugar
- 3 ¼ cups bread flour
- 2 teaspoons salt
Instructions
- In the bowl of your stand mixer, mix your yeast, warm water, and sugar. Allow the mixture to sit until the yeast becomes frothy, about 5 minutes.
- Once the yeast is ready, add the flour and salt to the bowl. using the dough hook attachment, mix on low speed until the dough comes together, about 3-4 minutes. Increase the speed to medium and mix it for 3-5 minutes to develop the gluten.
- Once the dough is done mixing, remove it from the mixer and place it into an oiled bowl. Cover and let the dough rest until it has doubled in size, about 1 hour. Prepare a baking sheet by lining it with parchment paper.
- Dump the dough out onto a floured surface and pound the air out of it, fold it back in on itself into a round and place it back into the bowl, seam side down. Cover and let it rest for another 30-40 minutes.
- Once it has rested and risen back up again, dump it out onto a lightly floured surface and degas it again. Cut the dough in half and toll them both up into 10 inch baguette-like loaves. Place the loaves onto your prepared baking sheet, seam side down and cover them. Preheat your oven to 375 degrees fahrenheit.
- Proof your loaves until they are nearly double in size about 30-45 minutes. Once the loaves are ready, score your loaves (I did two diagonal cuts on each one) and bake them for 25-30 minutes. They should have a light golden crust and temp out to 190 degrees fahrenheit.
- Remove the loaves from the oven and allow them to cool to room temperature.
Nutrition
Nutrition information is automatically calculated, so should only be used as an approximation.


This is the best recipe I’ve found, and I’ve tried a bunch!!! Very good!! I did add more flour so it wouldn’t be as sticky and it tasted great!
As much as I wanted to add flour I did not. Yes the dough is tacky. But wow came out fantastic! Followed directions to a T and it was perfect.
This recipe turned out well, but next time I would add less water. I used bread flour and mixed/kneaded by hand (personal preference). I would estimate that I had to add an additional 1 1/2 cups of flour in order to work with this dough, which is simply a waste of time. I would cut water by at least 1/4 cup next time.
Other than that, this recipe produced nice elastic dough and nice chewy, tasty loaves (great for homemade croutons).
This bread recipe was perfect! I had to add a little extra flour but it was no problem – I usually never use an exact amount of flour when I bake because it’s best to eyeball it. It turned out amazing – I didn’t know I could make bread this good. Best loaf I’ve ever made and definitely among the best I’ve ever had. It was a lovely pairing with my dinner and honestly was the tastiest part of the meal.
This was very helpful for making italian bread. Magnificent!
Stay away from this recipe unless you have a really good feel for bread making. I have successfully made various types of bread and decided to try this. It is horrendous. I had to add quite a bit more bread flour. It looks supple; rising at this time; but definitely not worth the aggravation. I would have checked the entire thing but did not want to waste my flour. Would give zero stars if possible
I used this recipe for the first time On Friday it came out perfectly fine. Did you do the 3 and 3/4 cups flour, or just 3 3/4 cups?
This dough is very easy to work with. I use my hands and a rice paddle instead of a dough hook in a mixer and had no trouble with the ratio of flour to water.
I tuck my bowls of dough into the microwave for proofing and this recipe rises rapidly and beautifully. Thanks so much for sharing it!
I actually had to add a tablespoon of water to get it to stick slightly to the bottom of the mixer. Was everyone else useing AP and not bread flour? Definately NOT a batter.
Loved it, everything came out perfect, not sure if it’s bc I made a double batch, but I had none of the issues these other people seemed to have.
This was my first time making bread. The recipe was easy to follow and the results were fantastic! I had no issues with the amount of flour. Everyone in my house loved it and I will be making it again! Thank you!
This is not a recipe that I would recommend. It turned out very soupy. I had to add quite a bit more flour. I would have totally dumped but did not want to waste the flour
I was looking for a relatively easy bread recipe and this seemed like it would fit the bill. Starting off, the flour measurement is completely wrong and I had to add almost an additional cup of flour because it was a sludgy wet mess. Bread ended up with a nice bottom crust but not much else. A very strong yeast flavor, rubbery top crust, flat crumb. I make bread often and have fresh ingredients on hand, so I know nothing was wrong with the ingredients. I would not make this recipe again.
Followed with exact measurements; this makes a BATTER, NOT a dough.
The water to flour is 4:3!!!
Totally unworkable.
Had to add a cup and a half more flour.
Wish I had calculated the water ratio before starting.
Pass on this.
HORRID!
Me too. I added an extra cup of flour. This recipe is way off at a hydration of 107%!
Loved it, everything came out perfect, not sure if it’s bc I made a double batch, but I had none of the issues these other people seemed to have.
You may have misunderstood the flour measurements. 3 and 3/4 cups flour not 3 3/4 cups try it again. Instead of water add pineapple juice it make a great sweet bread. 🤗
I have tried this recipe 2x before always with the same result. I think there is a typo, since recipe states 3 1/4 not 3 3/4. This is only a difference of 1/2 cup flour. The very wet dough would not be greatly effected by that amount. It takes well over a cup, to even begin bringing this together.
This recipe is very flawed. Take it from me, a certified pastry chef.
Would greatly appreciate if she put grams for the dry ingredients since it’s far more accurate.
I have been baking for awhile now and have been searching for a bread that is good for sandwiches. Like cook in the oven in foil and fillings and it won’t turn into a brick bread.
Ohmygosh this bread is amazing on its own or in sandwich form. The only thing I changed was I added Italian spices and herbs into the dough because we were making sausage sandwiches. We didn’t have to hollow out the bread loaves before we filled them because they were so soft and pillowy, definite family favorite! Thank you!
Thank you so much for trying it!