
This website may contain affiliate links and advertising so that we can provide recipes to you. Read my disclosure policy.
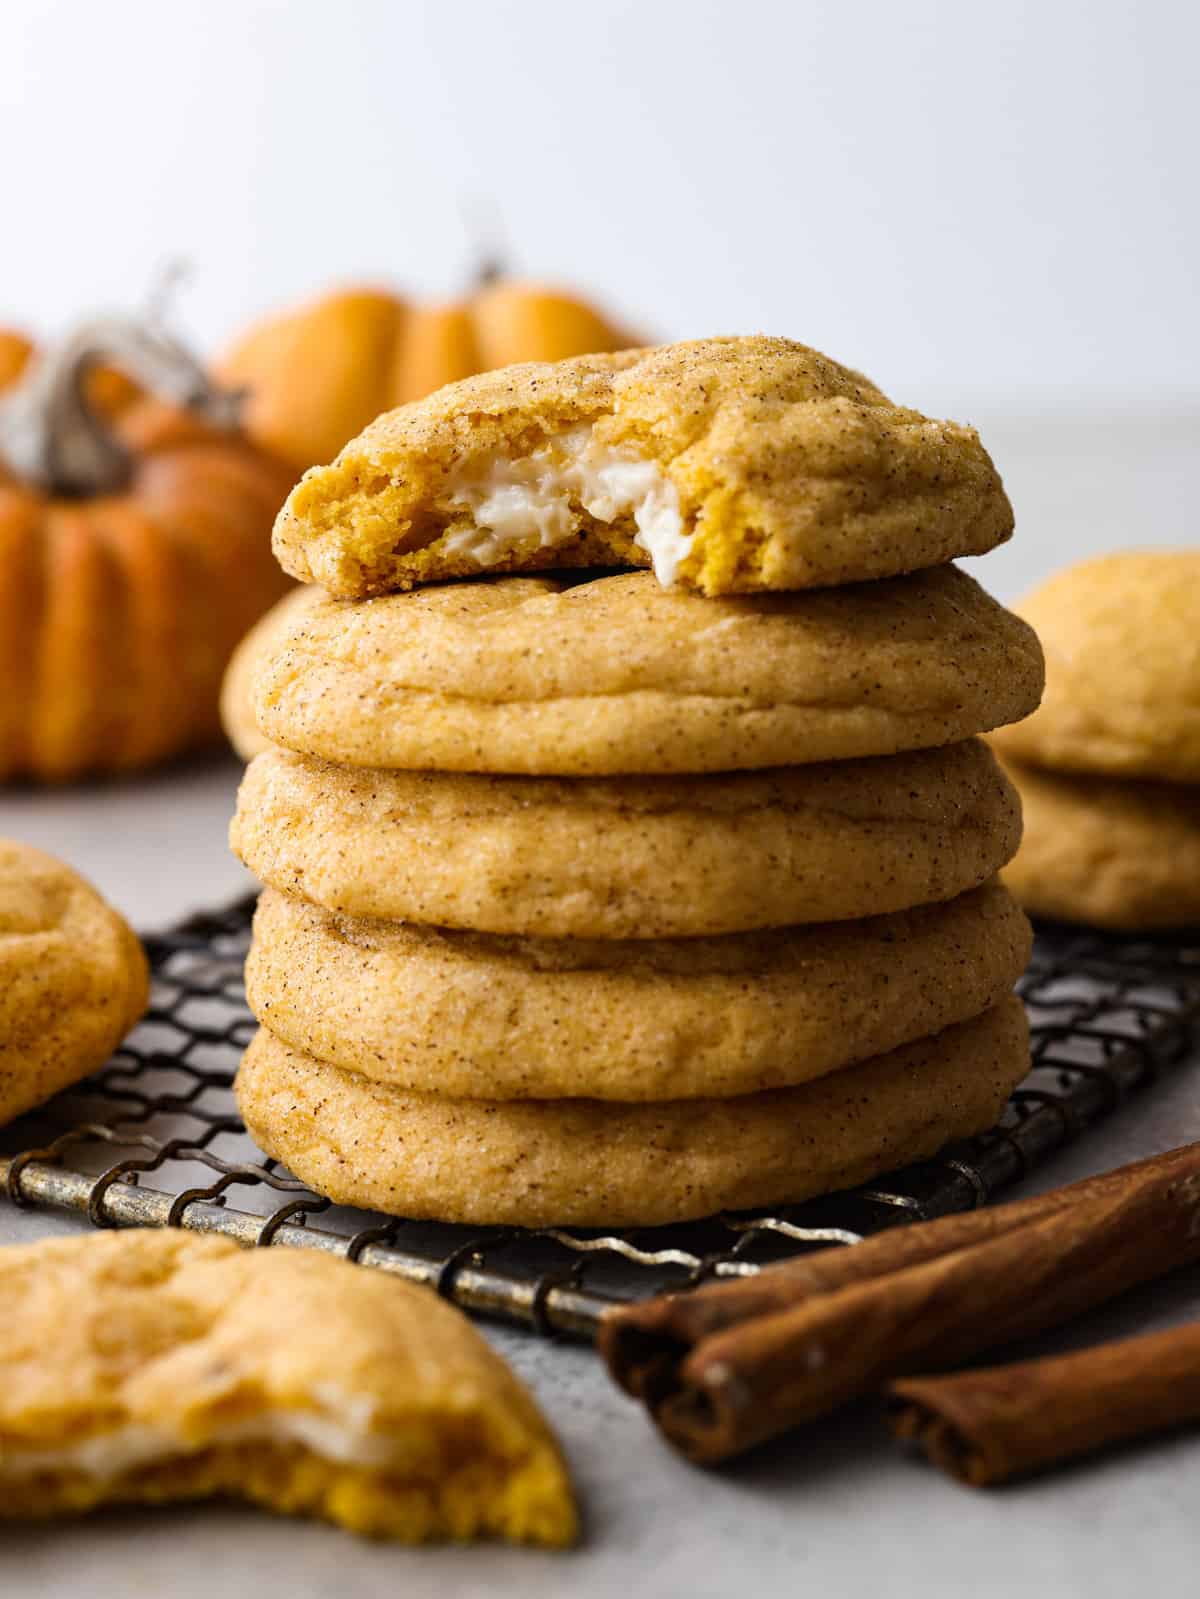
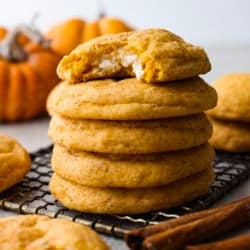
Pumpkin cheesecake snickerdoodles are a fresh take on a classic cookie! Delightfully soft and filled with tangy cream cheese, these cookies will be sure to get a “WOW!” from your friends and family!
I love any recipe that I can add pumpkin to and these cookies are no exception! If you love pumpkin as much as I do, go ahead and try some of these Muffins, this Bread Pudding, and the most Perfect Pumpkin Bread! You will go crazy for them all!

A Reader’s Review
I’ve made these at least 5 times now and every time they work out super great!! Never had an issue with any part. Always have a gooey cheesecake center! Thanks for a great recipe!
Reasons These Cookies are the BEST
- A twist on a classic: A pumpkin cheesecake snickerdoodle is a twist on your classic snickerdoodle and takes it to the next level. Filled with all of the same sweet cinnamon flavors, with the addition of a yummy cream cheese mixture in the middle, these cookies are something that you will love!
- Soft: I love a good soft cookie and these snickerdoodles are the best!
- They freeze well: Double the batch and freeze them for up to 3 months!
Soft Pumpkin Cheesecake Snickerdoodles
This recipe is perfect for an after-school snack, a game day treat, or just bringing a treat to your neighbors. Whatever you do, I suggest making more than one batch. They are so good, and they will be eaten up in no time!
Ingredients You Need to Make Pumpkin Cheesecake Snickerdoodles
This delicious ooey-gooey recipe is going to become a staple at your house. Because the base flavor is delicious cinnamon, once you add in some pumpkin and cream cheese, you are making the perfect fall treat! See the recipe card below for a list of exact ingredients.
- All-purpose flour: This combines your ingredients and helps thicken the dough.
- Baking powder: This helps the cookies to rise.
- Salt: This enhances the flavors of all of the ingredients.
- Cinnamon: You can’t have snickerdoodles without a delicious cinnamon taste.
- Nutmeg: Brings that delicious earthy flavor that we all know and love!
- Butter: It’s best to use unsalted butter that is at room temperature for these cookies.
- Sugar: Adds sweetness to the cookie dough.
- Brown sugar: This is the best type of sweetener, and the flavor can’t be beat.
- Pumpkin puree: Don’t confuse this with pumpkin pie filling!
- Egg: Use an egg that is at room temperature.
- Vanilla extract: This adds some flavor to the sweetness.
Filling Ingredients
- Cream cheese: Make sure to set your block out so that it is softened before you use it!
- Sugar: Sweetens up the tangy cream cheese.
- Vanilla extract: Adds some flavor to the sugar’s sweetness.
Cinnamon Sugar Coating
- Sugar: Adds sweetness to the spices!
- Cinnamon: Use ground cinnamon and mix it well with the other spices.
- Ginger: Ground ginger will work the best and add in an earthy flavor.
- Allspice: This is the best spice to bring out that fall taste!
Baking Tips
Since these are a bit different than your traditional snickerdoodles, I have come up with a few baking tips to help these turn out just perfectly for you! They are seriously SO good! I can’t wait for you to try them!
- Pumpkin puree: Sometimes, people think that pumpkin pie filling and pumpkin puree are the same thing… they are not! Pumpkin pie filling is mixed with spices and flavors, and you don’t want that for these cookies since you are adding those on your own. A can of pumpkin puree will be orange inside, and all that is listed on the ingredients will be “pumpkin puree.” So make sure that you are getting the right one!
- Chill: Before you ball up the dough and put it in the oven, it’s best (at least in this recipe) to chill your dough and cream cheese filling. This will help your cookies stay fluffy and not spread in the oven!
- Fresh ingredients: For the best results in your baking, make sure that all of your ingredients are fresh! This means that you should be replacing the baking ingredients in your pantry every 3-6 months. They start to lose their flavor and potency after that!
How to Make Pumpkin Cheesecake Snickerdoodles
These homemade pumpkin cheesecake snickerdoodles are easy to make! In fact, bake up a few batches at once so that you have some for later! It will be so simple, and once you see how fast they get eaten, you’ll be glad that you did!
Prep
- Whisk dry ingredients: In a medium bowl, whisk the flour, baking powder, salt, cinnamon, and nutmeg together. Set aside.
- Beat butter, eggs, and sugar: In a mixer with a paddle attachment, beat together the butter and sugars on medium-high speed until fluffy, about 2-3 minutes.
- Blend and mix together: Blend in pumpkin puree, beat in egg, and then add vanilla. Slowly add dry ingredients on low speed just until combined. Cover and chill the dough for an hour.
- Make the filling: To make the cream cheese filling, blend cream cheese, sugar, and vanilla together. Chill for an hour.
- Prep and baking sheets: Preheat oven to 350 and line your baking sheets with parchment paper. In a small bowl, combine the sugar and spices for the coating and set aside.
Bake
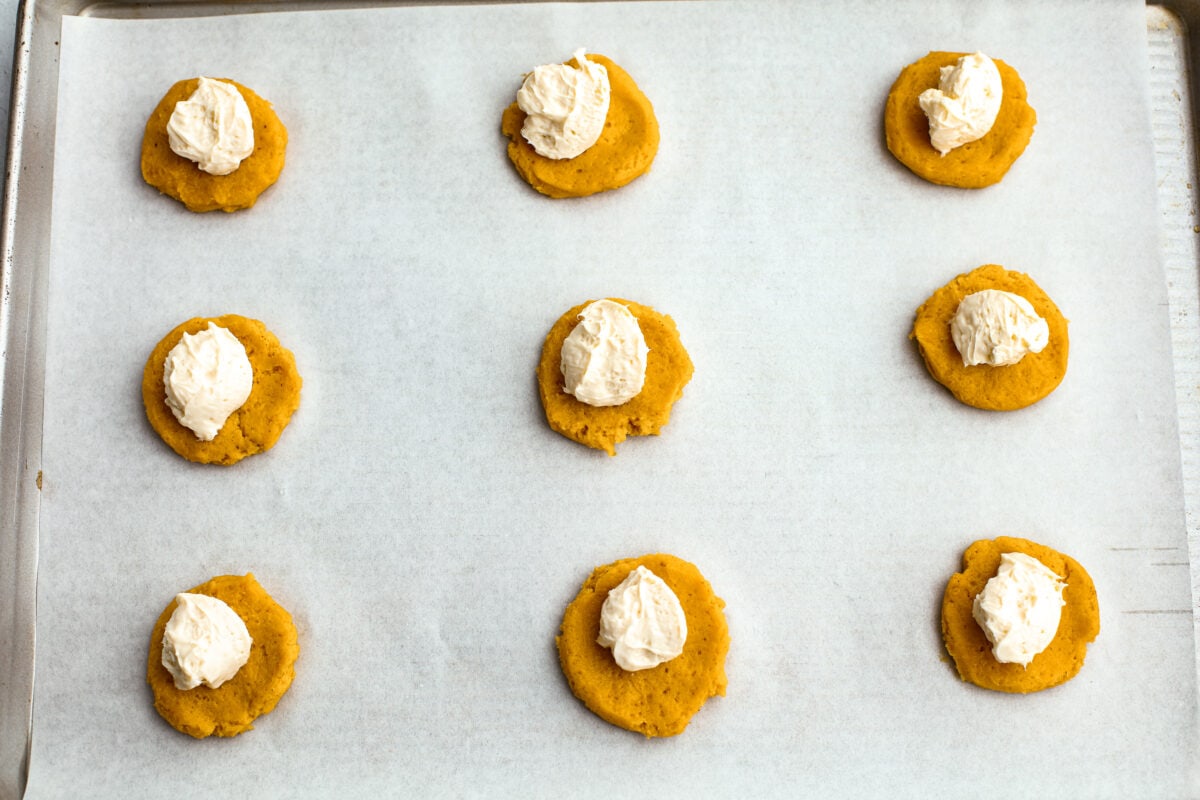
- Make cookies: To make the cookies, take a tablespoon of the cookie batter. Flatten it like a pancake and place a teaspoon of the cream cheese in the center.
- Add cream cheese mixture: Form another tablespoon of the cookie batter into a flat pancake shape and place on top of the cream cheese. Pinch the edges together, sealing in the cream cheese, and roll into a ball. Roll in the cinnamon sugar coating and place on the prepared baking sheet 2 inches apart.
- Flatten dough: Repeat until the dough is gone, and flatten the cookie dough balls with a heavy-bottomed glass or measuring cup.
- Bake and cool: Bake the cookies for 10-15 minutes or until the tops start to crack. Let cool on the baking sheet for 5 minutes and transfer to a wire rack. Enjoy! These pumpkin cheesecake snickerdoodles are the best!


Storing Leftovers
If you have some pumpkin cheesecake snickerdoodles that didn’t get eaten all at once, here is how you can store them for later! That way, you can eat them all week long!
- Refrigerator: Because these cookies have cream cheese in them, don’t store them on your counter. Place your cooled cookies into an airtight container and leave them in your fridge for up to a week!
- Freezer: Store your cookies in a sealed, airtight container or freezer ziplock bag. Label the bag with the date, and then you can store them for up to 3 months! Just thaw them in the fridge before you want to eat them.
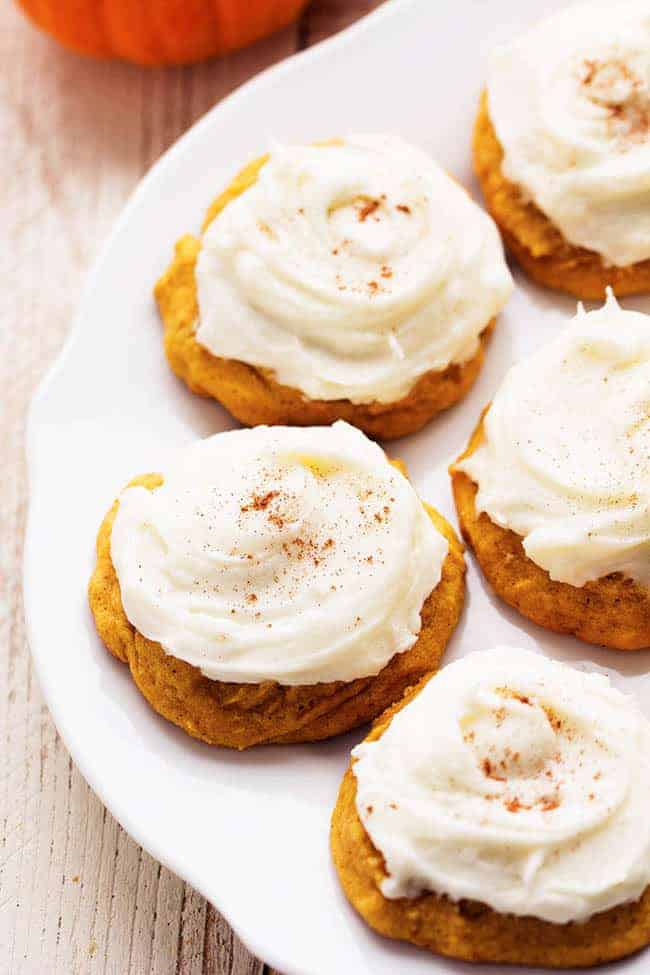
More Delicious Pumpkin Desserts to Try
If you loved these pumpkin cheesecake snickerdoodles, then it’s your lucky day! I have come up with a few more pumpkin desserts that I think that you will love as well! They are all amazing to add to your Autumn pumpkin recipes.
Pin this now to find it later
Pin It
Pumpkin Cheesecake Snickerdoodles
Ingredients
- 3¾ cups all-purpose flour
- 1½ teaspoons baking powder
- ½ teaspoon salt
- ½ teaspoon ground cinnamon
- ¼ teaspoon freshly ground nutmeg
- 1 cup unsalted butter, at room temperature
- 1 cup granulated sugar
- ½ cup light brown sugar
- ¾ cup pumpkin puree
- 1 large egg
- 2 teaspoons vanilla extract
Filling Ingredients:
- 8 ounces cream cheese, softened
- 1/4 cup granulated sugar
- 2 teaspoons vanilla extract
Cinnamon-sugar coating:
- ½ cup granulated sugar
- 1 teaspoon ground cinnamon
- ½ teaspoon ground ginger
- dash allspice
Instructions
- Whisk 3¾ cups all-purpose flour, 1½ teaspoons baking powder, ½ teaspoon salt, ½ teaspoon ground cinnamon, and ¼ teaspoon freshly ground nutmeg in a medium bowl. Set aside.
- In a mixer with a paddle attachment, beat together 1 cup unsalted butter, 1 cup granulated sugar, and ½ cup light brown sugar on medium-high speed until fluffy, about 2-3 minutes.
- Blend in ¾ cup pumpkin puree, beat in 1 large egg, and then add 2 teaspoons vanilla extract. Slowly add dry ingredients on low speed just until combined. Cover and chill the dough for an hour.
- Blend 8 ounces cream cheese,1/4 cup granulated sugar, and 2 teaspoons vanilla extract together to make the cream cheese filling. Chill for one hour.
- Preheat oven to 350 degrees Fahrenheit and line your baking sheets with parchment paper. In a small bowl, combine ½ cup granulated sugar, 1 teaspoon ground cinnamon, ½ teaspoon ground gingerand a dash allspice for the coating and set aside.
- To make the cookies, take a tablespoon of the cookie dough. Flatten it like a pancake and place a teaspoon of the cream cheese in the center. Form another tablespoon of the cookie batter into a flat pancake shape and place it on top of the cream cheese. Pinch the edges together, sealing in the cream cheese, and roll into a ball. Roll in the cinnamon sugar coating and place on the prepared baking sheet 2 inches apart.
- Repeat until the dough is gone, and flatten the cookie dough balls with a heavy bottomed glass or measuring cup.
- Bake the cookies for 10-15 minutes or until the tops start to crack. Let the cookies cool on the baking sheet for 5 minutes and transfer to a wire rack. Enjoy!
Video
Notes
Nutrition
Nutrition information is automatically calculated, so should only be used as an approximation.


Can these cookies be frozen?
Yes, these will stay in the freezer for about 3 months.
How many cookies does this recipe make (as made with no changes to the recipe)?
About 24 cookies depending on your size of cookie.
There are alot of ingredients. Is it possible to use pumpkin pie mix in the can instead of pumpkin puree? I live by myself and like to share but this looks like slot. Anny suggestions?
You are welcome to try it. It does change the consistency and already has most of the ingredients in it.
Is there a way to make these gluten free? I know substituting gluten-free flour sometimes requires altering a recipe. I make these every year around fall for my friends and family (they’re always a hit!) but this year I’m dating someone who’s gluten free and I want to make them for him as well
I made them gluten free with gluten free baking flour and they turned out great! I’ve never had them not gf so I don’t have anything to compare, but being gf I thought they were good!
The video shows just one flattened cookie with cream cheese rolled into a ball. But the instructions say two flattened cookies. Which is the correct way?
It depends on how big you would like to make them. Smaller ones you can do two flattened cookies or larger ones with one flattened cookies.
If you have two flattened cookies and roll them into a ball it will be twice the size of one flattened cookie rolled into a ball.
Maybe you mean make the flattened cookies themselves smaller…or larger…or maybe not.
This whole recipe is a head scratcher.
Opps! Could you please change my name to Victoria M and not use my full real name that my chrome auto fill entered. Thanks much
Made these for Christmas 2018. Tasted great but my cream cheese in the middle seemed to have been absorbed into the cookie and very little to find when biting into it. I didn’t skimp on the filling either so I don’t know what I did wrong. Will try these again because the cookie really was great tasting. Thank you!
Just made this recipe, and after reading the comments, I decided to freeze the cream cheese filling for 1 hr and fridge for 1 hr and cool the dough in the fridge for 2 hours. The dough was easy to work with, and I didn’t have the sticky mess that others encountered. I folded the cookie as shown in the video, and they turned out great! The only issue is that I didn’t think the pumpkin flavor was enough, and that was with accidentally adding a little more than the recipe called for. I would probably add 1- 1 1/4 cup next time to get more pumpkin flavor and better color.
I noticed you didn’t use creme of tartar. Is it unnecessary in this snickerdoodle recipe? Thank you
IMHO, these are stuffed pumpkin sugar cookies, it’s not a snickerdoodle without cream of tarter and the zing it brings to the flavor
In her other recipe linked above, it says exactly that – it’s not a snickerdoodle w/o cream if tartar.
I wish I’d known this going into the whole process. I’m making them for a friend who loves snickerdoodles and pumpkin anything. No clue how they’ll hold up now.
Hi! I want to make these but am not sure about storage. Do they need to be stored in the refrigerator? If so, do they hold up or better made same day you plan on serving them?
You can store them in the fridge but that is not necessary.
I made these, following the ingredients exactly, kneading the dough with my hands, and not a mixer, as I do with all the cookies I make. When the dough is completely mixed, it should not be sticky. I watched and followed the video for forming the cookies, using a Tbs to loosely scoop the dough and 1/4 tsp to scoop loosely the cream cheese filling.. They baked closer to 15 minutes, even though my oven usually takes less time for most recipes. They came out as pictured, but I do agree that they are somewhat bland and dry. I would not suggest making these as your first attempt ever at cookie making. They are fun to make, but yes– time consuming. Not sure if I would make these again, unless I can figure out how to add flavor. It’s almost as though the cheese cake filling over powers the rest of the cookie.
I love these delicious cookies which I made gluten free by substituting Bob’s Red Mill Flour 1 to 1 for the flour. Unfortunately, I found the process tedious because I cannot stand for any length of time and was wondering if you had ever tried this recipe as muffins or cupcakes. I can only make 8 cookies as a time while I can make many more muffins/cupcakes at once. I am going to make them to sell at our Ladies’ Guild Annual Craft Fair to raise money for our annual expenses.. Any advice would be greatly appreciated.
I am a new baker, so forgive me if this is a silly question, but the first step includes mixing together the flour, baking soda, salt, cinnamon, and NUTMEG. I did not see nutmeg listed in the ingredient section though and I am curious where i came from and how much to use?
It is hard to see and it is ground nutmeg which could have hidden it with the words ahead of it. It is 1/4 teaspoon nutmeg and you will add it with all the spices in the instructions. Hope that helps! XOXO
These came out perfect!!! I chilled the dough and cream cheese in the freezer instead of the refrigerator. As each batch baked I put the dough back in the freezer to keep it workable and not so sticky. I also doubled the spices and added pumpkin pie spice. Made 15 dozen and each batch came out perfect!!! Great recipe!!!
As long as you chill the dough and cream cheese mixture any time it starts to get too sticky, this recipe worked great! I accidentally put the same amount of brown sugar in as the granulated sugar but mine tasted great, not too sweet. Not sure if that changed the dough consistency, or not. I bake a lot and this recipe definitely had more steps but once I decided to just pop the dough back into the fridge while a pan of cookies baked in the oven, all was well.
I read all of the comments about stickiness and difficulty of assembly before making these and have some suggestions to anyone trying to make them, as well as adjustments to the recipe directions:
If your dough is too sticky, it isn’t cold enough!! Do not add more flour. The directions say to chill for an hour, which is misleading. I took this to mean refrigerate, and I left it in the mixing bowl. The edges of the dough were almost firm enough to work with after than hour, but almost all of it was still too sticky and soft (warm). When it’s still in the bowl it doesn’t cool enough or consistently throughout in just one hour, so these directions aren’t the best or most straightforward. Maybe “chill” means to freeze? I say chill overnight in the refrigerator OR, to keep things moving I scooped cookie-portioned dollops of sticky dough onto my silicone mats (no forming, no stuffing yet) and froze them on the sheets for 10-20 min. This is a butter dough, so like pie dough the colder it is the easier it will be to work with! Scooping into smaller portions while still soft means the dough chills consistently throughout rather than only around the edges of the bowl. Trust me, it’s worth the extra step. Plus, dividing into the specified 24 will make sure they each get enough cream cheese when you stuff them. More cookies than that and I think some of them will end up with disappearing cream cheese.
When plenty cold enough the dough can be a bit crumbly. Better than sticky, but difficult. To fix this, first roll the dollop into a smooth ball, then smush flat, then add cream cheese. Pinch edges kind of like a wonton first (absolutely no need to make two pancakes to pinch together) and then smooth into a ball and roll in sugar mixture. This makes everything SO MUCH EASIER. Place two inches apart on sheet and smush as shown in the video.
Some people say the cream cheese disappears into the cookie during baking. In addition to some of them not getting enough filling, this may be because by the time you’ve finished stuffing, rolling, and smashing the cookies, the cream cheese is coming to room temperature and in the oven will be much more likely to melt. Refrigerate for a little bit longer after forming before baking to get the cream cheese colder again. Don’t freeze this time, though. Frozen cream cheese can turn a kind of grainy texture.
Finally, I ended up with lots of extra sugar topping, so before baking I sprinkled some of that extra on the tops.
These do take much longer to bake than given here. I adjusted the recipe for high altitude, which usually requires more liquid (didn’t add, since others said the dough was too sticky) and a higher temperature bake for shorter time. Even with the higher temperature (375) and high altitude these took a good 18-20 minutes. For non-altitude start with 350 and 15 min and monitor for the cracking on top as directed.
This is a great recipe. Good flavor and nice idea with the filling. Just needs some tweaking and clarification in the directions so bakers don’t have such a hard time with it. Thank you for sharing!
I too was a bit put off by the comments of dough being difficult to work with…so I tried a variation. I layered dough in a baking 9×9 baking dish, layered cream cheese, then finished off with another dough layer and sprinkled sugar mixture on top. Results…very much like a coffee cake…turned out great!
Snickerdoodle Pumpkin bars! Yum